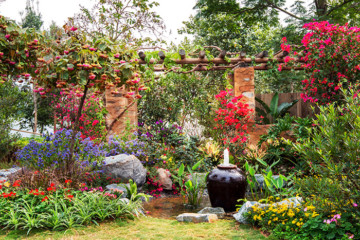
Top Garden Design Trends for 2020
We wish to keep our curb appeal up to date, providing a great view from the street. So, we scan articles like this one to learn what landscaping professionals expect to be most in-vogue in the new year. These garden trends and landscaping tips include thoughts of leading designers and others who predict upcoming garden designs for 2020.
As we’re not only starting a new year but a new decade, these simple tips will pertain for awhile. Also, it appears these landscape design ideas will be handy for years to come. Simplicity and low-maintenance are tips we can all appreciate and utilize and it appears they’ll be big this year.
This doesn’t mean we’ll tear out our already perfectly located plantings, but we might find inspiration for additions and new outdoor displays.
Belgian Design Landscaping
Described as luxurious simplicity, this planting style appears to be a favorite garden trend for the new year. This old-world type of landscaping includes repeat plantings and limited ornamentation. Landscaping tips for this simple style advise limiting ornamentation to single or well-coordinating pieces, possibly a baroque or old-world garden edging or a large weathered focal point. Less is more is a concept for the upcoming year.
Upcycle for the Garden
Repurposing for ornamentation with accessories that previously had another use is practical in the garden and also on an upswing for the coming year. Use your imagination as you encounter used items that no longer serve their original purpose.
Old tubs and buckets may become planters, as can old boots, shoes, drawers and other items. An oft-used item is an old tire, filled with hens and chicks or blossoming flowers. Old chairs serve as a display for the right size pot, while old windows and shutters can be repurposed as hanging displays. Some of these are painted, others are used as it. You’re only limited by your creativity when upcycling for the flowerbed.
Wildlife Friendly Garden Ideas
We all like the thought of a wildlife-friendly garden. And, in 2020, it appears more people will be planting to encourage local wildlife friends to make themselves at home in our landscape. Providing a steady supply of water and the foods they like is a great beginning. Nesting materials in the right location can make them feel at home as well.
If you wish to attract birds, place a few houses for them in spots where they prefer to dwell, such as hanging in a tree. Some birds repurpose for themselves, like rebuilding a nest left by another bird from last year.
Landscaping tips for planting to attract wildlife will include the use of native plants. Natives encourage pollinators to come, many of which are of a declining population. Plant lavender, milkweed and lilacs to invite the pollinators in. Some native plants discourage mosquitoes.
Frogs and toads in the landscape act as pest control, eating beetles, slugs and mosquitoes. Nighttime flowering plants and those that emit fragrance most heavily after dark invite another range of pollinators, like moths and bats. All pollinating species are great for the landscape.
Keep in mind, having wildlife in the landscape may necessitate extra protection for your vegetable crops and some ornamental plants. Deer, coyotes and even bears may feel invited. If your neighborhood is overseen by a Homeowner’s Association, they might look down on a wildlife friendly landscape. So might your neighbors. Animals won’t realize they need to remain in your yard only. A wildlife garden is appropriate for large landscapes without close neighbors. Consider both the pros and cons before you start planting to attract wildlife.
Edible Forest
Professionals see garden trends for 2020 bringing forage plants closer to home. This can go hand in hand with a wildlife garden and growing native plants. Most foraging specimens are edible and many more have medicinal uses. Plants listed below can easily grow in your home landscape for an annual harvest:
- Yarrow
- Mullein
- Rose Hips
- Dogwood
- Wild Comfrey
- Cattails
- Cedar Trees
- Walnut
Garden Ideas for Growing Vertically
Although we’ve become accustomed to seeing plants trained to grow upward, it appears this will be another popular garden design for 2020. If you haven’t already, get started with growing plants on a fence or trellis. Flowering vines, like morning glory, clematis, and cardinal vine grow quickly and have beautiful, long lasting blooms. The moonflower blooms at dusk and emits a delicious fragrance.
Some vines need a slender structure on which to scurry upward. A wire or cord addition can easily and inconspicuously be added to a fence or an arbor with large poles. Other vines will attach to any surface and continue upward, like some ivy. Be cautious of using these on lightweight fences or other supports that aren’t sturdy.
Incorporate these landscaping tips into your planting and design efforts when you revamp garden beds in spring. Keep them in mind as you upgrade your hardscapes and ornamentation outside and you can easily have pleasing curb appeal that extends through the decade.

How to Design a California Native Plant Garden
There are many reasons why California Central Coast residents need to consider native plants for their gardens. Not only are many extremely beautiful, but they generally require less care. This allows you to wow your neighbors without a lot of hard work. Native plants also are more resistant to pests, and they thrive in our conditions. They also usually require less fertilizer and fewer pesticides, so they are healthier for the environment. Keep these landscaping tips in mind when designing your California native plant garden.
Know Your Soil
It is essential to know your soil type before planting your native garden as it will determine which types of plants will thrive in your California garden landscaping. Ranging in elevation from 20 to 400 feet, soil in the Pajaro Valley tends to be sandy or clay loams that run extremely deep. If you live west of Watsonville, then you have clay soil, often called Clear Lake soil, that often drains very poorly. If you live in Watsonville, Pinto, or Elkhorn, then your soil may be slightly acidic.
Those owning a home around Sunset Beach State Park and Aptos have a sandy soil that often contains gravel. This soil allows water to drain very effectively, so you need to consider plants that have low water requirements when choosing your landscaping plants. As you move closer to Cowell Redwood State Park, the soil becomes better drained and is ideal for growing a variety of native grasses.
Once you reach Santa Cruz Mountain and the northwest slopes of Ben Lomond Mountain, then the soil becomes sandier, and it drains very well. The topsoil in this area may contain many needles, so you may need to remove the top two inches before planting your garden.
If you own one of the beautiful coastal homes, then you can expect slightly acidic and relatively deep soil. One of the most challenging areas to grow a native garden in is the Maymen area because of the thin clay soil that drains very well. Therefore, you need to choose plants that have shallow roots and like semi-dry to dry conditions.
Understand Your Moisture Levels
Across Santa Cruz County, moisture levels vary depending on location. If you live in the Pajaro Valley, or around Watsonville, Elkhorn, or Pinto areas, you can typically expect to receive between 25 and 28 inches of rain annually. The area around Sunset Beach State Park, Aptos, and Cowell Redwood State Park gets about 29 inches of rain annually. As you reach Santa Cruz Mountain and the slopes of Ben Lomond Mountain, you find moisture increases to about 48 inches annually. In the Maymen area, annual rainfall increases to about 50 inches.
How Many Frost-free Days will my California Garden Landscape Get?
Different areas of Santa Cruz County have varying amounts of frost-free days, and the temperature can vary drastically across the county. Considering these factors is one of the landscaping tips that are often overlooked.
If you live in the Pajaro Valley or the Watsonville, Elkhorn, Pinto areas, or around Sunset Beach State Park or Cowell Redwood State Park, expect a mean air temperature of about 58 degrees and a frost-free growing season of about 260 days.
Once you reach elevations between 400 and 3,000 feet in the Santa Cruz and Ben Lomond Mountains, you can expect the average air temperature to drop to about 55 degrees, and the number of frost-free days to drop to about 232. The Maymen area gets about 260 frost-free days annually with an average air temperature of 56 degrees.
Landscaping Tips for Putting It All Together
Now that you have a better understanding of the soil, moisture levels, and frost-free days in the part of Santa Cruz County that you reside, it is time to put it all together to create a beautiful native plant garden. Follow these landscaping tips:
Landscaping Tip #1: Choose the Right Plants
While you should have a better understanding of the growing conditions in your location, think about your landscape. The chances are that some areas of your yard get more sun than others. Likewise, you may have areas that stay drier than in other areas. Choose plants that thrive in these locations.
Landscaping Tip #2: Prepare Your Soil
The first thing that you should do is prepare your yard for your garden. If you have a layer of needles, then these generally need to be removed. Be cautious, however, to not disturb the soil any more than is necessary because this encourages weed growth.
Landscaping Tip #3: Add Nutrients if Necessary
Some soil may have been moved into your landscaping, which may not encourage native plants to thrive. Therefore, you may need to remove this topsoil before planting. On the other hand, you may want to work with a soil company that can match the natural soil if you need to add topsoil to your landscaping.
Landscaping Tip #4: Prepare Beds Early
Those living in Santa Cruz County are lucky because we get beautiful weather days, even in the winter. Use these days to prepare your beds as early as possible. Native plants usually thrive in beds that have been prepared two to three months before they are planted.
Using native California plants is an excellent way to landscape. Consider your environment and get started choosing the right plants. Call a professional California landscaping company today to

Commercial Landscaping Tips: Design To Maintenance
When we think of what it takes for a business to sustain success, most people think of a large financial backing, an efficient working environment, or other business processes. While these processes do contribute to success in some ways, the reality of the situation is that sometimes smaller factors make the biggest impact.
A great example of this can be seen with commercial landscaping. Because commercial landscaping has virtually no connection to internal business processes, its benefits are some of the most overlooked. If only more businesses paid more attention to it, they would realize that it has a big enough impact to directly influence qualified clients. Here's an example.
If a client has a choice between two businesses to go with, would the client be more likely to choose the business with a welcoming landscape or one without one? Sometimes decisions are that simple for clients. As for what qualities make up a good landscape, that will come down to various factors including garden design, landscape ideas, and other similar factors.
Overall, the goal with landscaping is to make your business come off as presentable, professional, and welcoming as possible. If you can hit on these three qualities, your chances of attracting and converting relevant clients will increase significantly. With all of this in mind, here are ten commercial landscaping tips from design to maintenance.
1. Create A Landscaping Blueprint
Before doing anything in your landscaping process, you should create a landscaping blueprint. Doing so serves the purpose of allowing you to create the most efficient working environment. Landscaping blueprints can include factors such as schedules, design ideas, and checkups as well. The best part about it is that you can design one to fit around the needs and requirements of your landscaping duties.
2. Match The Landscaping Style With Surrounding Architecture
As far as landscaping design is concerned, there is no wrong way to design. Again, as long as it creates a welcoming and professional feel, that should be enough to benefit from it from a business perspective. One pro-tip that has benefits businesses is landscaping that matches the style of the surrounding architecture. For example, if a business has a straight and narrow building, molding the landscape to fit those qualities makes it more presentable. Just keep in mind to not go overboard with simplicity or extravagance. Landscaping should also create a balance between professionalism and beauty.
3. Create Clear Paths/Walkways
The most noticeable parts of landscaping for commercial buildings will be the walkways. They are important because they are used as guides to direct people towards specific parts of a building. For this reason, your walkways and paths designs should be clean and clear. Anything other than a clearly marked path makes your landscaping come off as unprofessional and off-putting.
4. Highlight Colors
Another pro-tip that can work for your landscaping is highlighting colors. Especially if your landscape has flowers and bright flora to work with, working them into your design will create the most inviting feel for your business. However, it's worth repeating that nothing should be done overboard. Even flowers and bright colors can seem off-putting if it is used too much within a design. To get a better sense if you have used too much color highlighting within your design, put yourself in your client's shoes and critique your design from afar.
5. The Obvious: Water Regularly
Perhaps no other landscaping maintenance process is as important as watering regularly. As one of, if not the most obvious maintenance step, it's surprising to see how many landscapers either underwater or overwater their designs. Both mistakes can have devastating consequences on the overall health of your landscape. To avoid any watering mistakes, consider creating a watering schedule to increase your precision.
6. Don't Use Cheap And Easy Landscaping Tools
Next to watering your landscape, another important maintenance tip to keep in mind is not using cheap and easy landscaping tools. These tools are specifically designed to get landscapers to spend more money. If you think you are creating the most cost-effective landscaping plan for your design, understand that these tools have a higher chance of damaging your designs more than they can help them. This doesn't mean that you have to spend thousands of dollars on the latest and greatest equipment. All this means is that you should be responsible enough to save for high-quality tools that will benefit your designs the most.
7. Run Small Monthly Landscape Checkups
Once you have completed a design, checking up on it will ensure that your landscape stays healthy in the long run. The idea behind running monthly checkups is that it protects against unpredictable weather conditions. Also, it allows you to make any additions that you might have forgotten about during your initial landscape design process.
8. Run Large Seasonal Landscape Touch-Ups (Or Remodels)
Monthly landscape checkups should not be confused with seasonal touch-ups or remodels. The difference between the two is that seasonal touch-ups are larger maintenance events that serve the purpose of keeping up with the seasonal environments. These projects require more time and effort than monthly checkups.
9. Shoot For A Sustainable Design
Having mentioned how beneficial it can be to match the landscape design to the surrounding architecture, the overall rule with design should be to shoot for sustainability. In other words, it should be designed to protect itself during any natural conditions. This could mean designing your landscape with extra bulkiness, shorter edges, plants that require less maintenance, or anything else that will allow it to keep the same look over time.
10. Recycle What You Can
Last but not least, responsible landscapers should always recycle what they can. Apart from being environmentally healthy, recycled goods can be reused back into your landscape for patches, remodels, or any other maintenance benefits.
Winter Landscaping Tips for Property Owners
Winter may be here, but that’s no reason to neglect your landscaping. You may not have as much to do in your yard during the next few months, but there are some things you should do to ensure that your yard looks good. When it comes to winter landscaping tips, below are some that will keep your property well maintained.
Winter Landscaping Tips
Many of your plants may have gone dormant this time of year, but taking care of them now will ensure that they come back healthy and strong in the spring. This will keep your yard looking beautiful and well maintained.
1. Get Rid of Debris
During the fall and winter, your yard can get covered in a lot of debris. Leaves may fall from trees and storms can blow in trash or knock down loose branches. There’s no reason to wait until spring to take care of this mess, now is a good time to pick up your yard.
Should you neglect to pick up the debris in your yard and it mixes with moisture, this increases that chances of mold and fungus growing on your property. This can have an impact on your grass and other plants, including killing them. If debris is allowed to sit on your lawn, this could impact your grass. To reduce the chances of having a spotty lawn, get rid of debris throughout the winter.
Making it a point to check your property and remove debris once a week will keep your area looking neat and tidy. It will also reduce the amount of work you need to do to keep your yard pristine.
2. Don’t Forget to Water
Just because your plants have gone dormant or the leaves have fallen from your trees, this doesn’t mean they can be neglected. Various plants, trees and shrubs still need water this time of year, so make sure you are keeping them hydrated. If you don’t, this could increase their susceptibility to disease or allow them to die.
As long as the temperature is higher than 40 degrees Fahrenheit, you should be watering your plants on a regular basis. If it dips below 40 degrees, you can refrain from watering until the temperature climbs back up.
3. Prune Your Trees
Once the leaves are gone from the trees in your yard, it will give you a good view of damaged branches. Taking the time to remove these items now will ensure that your tree comes back looking amazing in the spring. Pruning your trees will also make them healthier and stronger.
4. Cut and Fertilize Your Grass
Cutting your grass 1 to 2 inches shorter than normal before winter appears can help reduce the risks of cold temperatures having an impact. Adding fertilizer means that your grass will continue to get the nutrients it needs to come back healthy and lush once spring rolls around.
5. Protect Plants from the Cold
Some plants can handle temperature variations better than others, while some may die if the temperature dips too low. This is especially true for young trees or plants that you might have on your property. For tips on how to keep them protected, you might consider covering them through the winter.
Using a light-colored wrap around the bark or over the top of the plant will ensure that they can still benefit from the sun but will be protected from colder temperatures. It will provide insulation and warmth so that they come back in the spring.
6. Consider Planting Winter Plants
If you’re looking to add to your landscape design, then you might consider planting some winter trees. Evergreens and maple trees thrive when planted during the winter, and they can add a pop of color to your property.
In addition to these trees, when it comes to landscape design ideas, you might consider adding trees that have highly textured bark to your property. Dogwood, birch and crabapple trees add something unique and lovely to your garden design. A crabapple tree can add color because they retain their fruit even when it gets cold outside.
Not only are some trees good to plant this time of year, but you can also add some flowers to add color to your property. Depending on your latitude, you may be able to plant Christmas roses, winter jasmine, honey wort, winter honeysuckle or kaffir lilies. Any of these can add something extra to your property and make it feel alive during the long winter months.
7. Mulch
The winter is one of the best times to add some mulch to your property. Not only will it help your landscape look good and add something special to your plant life, but it will also help keep the roots warm when the temperature drops.
8. Consider Adding Lights
During the winter, the days are shorter. For some landscaping tips to ward off the dark, you might consider adding some lights to your landscape design. You have a lot of options to choose from, including hanging string lights from your patio or adding ground lanterns to your walkways.
With the holidays coming up, you can certainly add lights to the outside of your home to show off your festive spirit. However, adding solar-powered or softly colored lights to your property other times throughout the winter can add some pizzazz to your landscape.
Your Landscaping Deserves the Best
No matter what time of the year it is, your landscaping adds to the aesthetic appeal of your property. Even in winter, there are tips you can follow to ensure that your home looks good.
Walkways and Paths for your Landscape Design
Walkways and Paths for your Landscape Design
Nothing adds a touch of elegance to your lawn like a winding walkway. According to sfgate.com, California homeowners who upgraded the landscape design of their yard raised their home's market value anywhere from 5.5 percent to 12.7 percent in 2018. Besides its aesthetic importance, a secure pathway will prevent trips or turned ankles at your next backyard barbecue. If you're ready to make your landscaping stand out, follow these guidelines to create the perfect walkway.
Exploring Landscape Design Ideas for Your Walkway
Establish a Budget
Planning a budget is crucial when you have a landscape design project. Even though you might adjust your budget throughout the process, you'll benefit from getting an estimation of what you can afford. The costs of materials, tools, and labor are all worthy of consideration.
Decide on a Concept Design
Before you begin laying your walkway, it's best to decide on a design idea. This serves as a blueprint for installation as well as allowing you to see how the finished product will look. Inspiration can come from anywhere: feel free to visit our online gallery to find your favorite walkway style. You can even get customized concept designs, meaning your pathway will be both original and ideal for your needs.
How Many Options Are There?
Walkways can be built in any shape from a range of materials. If the sheer number of choices seems overwhelming to you, the following tips might help you narrow down your options.
Shapes
Your walkway's shape depends on its functionality and location. A straight, wide path makes a powerful and formal statement, while curved paths are more playful. Straight paths are a great choice for the walkway at the front of your home; on the other hand, curved paths create a free-spirited atmosphere for your garden. You can further emphasize the shape of your walkway by lining it with hedging or railroad ties. Walkways may also need to be tiered if there are enough elevation changes along the path.
Materials
The most popular pathway materials include concrete, brick, or pavers made from different types of stone (such as flagstone, cobblestone, or limestone). The most practical building material, brick blends seamlessly with many colonial-style homes. Concrete walkways are robust and harmonize with most landscape design elements. On the other hand, pavers afford much more diversity. Available in a spectrum of colors and shapes, pavers can be used to create fresh, organic pathways full of personality. Although it tends to shift due to erosion, pea gravel is inexpensive and easy to replace. Choosing a building material depends on your personal preferences as well as considering each material's pros and cons.
Patterns
The pattern of your walkway can range from intricate designs to simple rows. Brick patterns include jack-on-jack (grid), running bond (offset grid), herringbone, and pinwheel. Many people get creative with their walkway patterns and receive breathtaking results. Whatever you decide, it can be a good idea to arrange your materials in a demo pattern to make sure you'll love the finished product.
Installation
Once a design plan is drawn up, you can begin building your walkway. Before you start, you may want to brush up on California's building codes and buy safety gear such as dust masks and safety glasses. First, the shape of the walkway needs to be determined — straight paths are carved out with stakes, while curved paths are outlined with hoses. You will then need to excavate the top layers of dirt inside this outline. You'll need to leave enough clearance so that the pavers sit slightly above the ground. A level will be necessary to maintain the correct slope for the walkway; if possible, use the natural slope of the lawn to your advantage.
Walkways usually involve three layers: a base layer of packing material or panels; several inches of sand; and the pavers on top. A piece of 2x4 lumber or hand tamper is used to level out the sand. Once you have a smooth surface, you can begin laying the pavers. If the pavers need to be cut to fit into the walkway (especially if it is curved), a circular saw with a concrete or diamond blade will do the trick. Once the pavers are laid, you should put down spiked edging to hold them in place.
Finally, use a plate compactor to tamp polymeric jointing sand in between the pavers. Any excess can be swept away with a push broom. Repeat the tamping process until the paver joints are filled. Then, hose off the walkway with water to activate the bonding agents in the sand.
Maintenance
Keeping your walkway in prime condition calls for minor upkeep. Even if you laid down a weed barrier, weeding might be essential to keep paver joints clear. Over time, grime can accumulate over the walkway. Using a pressure washer might be necessary to remove excessive stains, but scrubbing the pavers with a wire brush and mild cleaning solution usually works. You can also apply paver sealant every few years to add another layer of protection and revitalize the paver colors.
Decorating Your Walkway
Even though your new walkway shines all on its own, decorating it will add personalized flair. Here are some suggestions to get you started.
Install Solar Lights
Going outside in the dark can be hazardous. An easy and attractive way to avoid falls is to line your walkway with path lighting. You can choose from a spectrum of LED fixtures, solar lights, and lamp posts. As a bonus, ensuring your yard is well-lit also increases home security.
Plant Flowers
A row of colorful blossoms will beautifully complement the more neutral tones of your walkway. Low-growing plants like salvia, daylilies, and phlox will proliferate in any patchy areas. The climate of the Scotts Valley region is favorable for most kinds of plants, but you may need to research how to best care for your flowers.
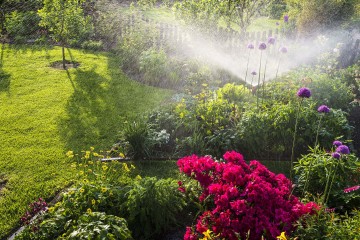
Water is Important for Your Garden
Did you know that every plant in your garden beds and each blade of grass on your lawn contains at least 85 percent water? This is why professional landscape design often starts from a place of visualizing water usage and flow (especially here in California where every drop literally counts).
It is also why even the best landscape design ideas, once implemented, may fail to survive and thrive if your new greenery gets too much or not enough hydration. Some plants simply need more watering while others need less, especially as the seasons shift.
And there is no doubt that calculating just the right amount of water is becoming more challenging with the onset of climate change, which is why we wanted to share these general tips you can apply to your own landscape greenery.
What Does Hydration Do for Grass and Plants?
Hydration offers much more than just nourishment to your garden, lawn, trees and landscape.
Let's take a closer look at what happens out there on the lawn right after you turn the sprinkler system on.
Photosynthesis.
Plants can't order takeout or go through the drive through when they are hungry. They have to make their own food from scratch in-house. They do this through a process called photosynthesis.
You probably remember photosynthesis from your school biology textbook. The "photo" in this word refers to light - specifically, sunlight. The "synthesis" refers to how plants use water, sunlight and air to make their food, which is glucose, a simple sugar carbohydrate.
So even though you probably have bags of fertilizer and additives labeled "plant food," these really aren't true food sources for your lawn and garden. They are simply boosters that help plants and grass make food more quickly and efficiently.
Transpiration.
The word transpiration basically means "sweating plants." Plants don't sweat through pores like people do. Rather, they sweat through tiny holes in their leaves that are called stomata.
What makes a plant start sweating? They do this for basically the same reason that people and pets sweat - to try to self-regulate their temperature. A plant or blade of grass will start sweating, or transpiring when it gets too hot. The act of sweating cools the plant and keeps cells from dying off.
Circulation.
While it is true that plants can't order takeout, their cells actually can - and do. Circulation is the process by which hydration transports vital nutrients from the surrounding soil and air into the plant, delivering them to each cell inside the plant's structure.
In this way, hydration functions a lot like your own circulatory system, carrying nutrition to the cells and then transporting away waste and unnecessary by-products.
Keeping Your Lawn and Garden Well Hydrated Isn't Always Easy
There is a reason we get so many calls from new clients who want to know if it is possible to save their soggy or bone-dry lawns, leaves and foliage. It isn't always easy to care for plants in the way they need!
So now let's take a look at some general tips to help you keep your grass, garden beds, lawn and landscape happy and healthy.
Study what each varietal needs.
Different plants can have vastly different care needs and requirements. Some are quite tolerant of dry conditions from the start and others only after they have become established.
Some are literally thirsty all the time and can't see to ever drink enough. And some plants fall somewhere in between.
While it can take a bit of work on the front end, plotting out what each plant under your care needs from you, including moisture requirements, can make your lawn and garden care strategy so much easier as well as less costly.
Hydrate in sections.
First, it is important to plan out your strategy in advance in sections. This not only conserves resources (and your monthly hydro bill) but also allows for each area to get the moisture it needs, neither too little nor too much.
Here, it is also vital as much as you can to ensure your landscape design groups like-needs plant life together. It is much harder to care for plants with very different care needs when they are placed side by side in a garden bed!
If you have inherited a landscape design where unlike varietals must share available moisture, one good tip is to use spikes or straws to deliver hydration individually to the plants that need more while sparing those that need less.
Ultimately, when time and budget allows, you may want to consider some different landscape design ideas to lessen your workload and ensure the survival of your plant life.
Use tools to conserve moisture.
There are lots of strategies you can employ to conserve moisture and also protect your wallet. Timed sprinkler systems, where available, are a great aid to this end.
Mulch offers an easy, economical way to hold moisture in without risk of leaving the roots over-saturated. The mulch will absorb moisture that might otherwise drown the roots, holding it close so the plant can make use of hydration as it needs more.
Visual inspection is sometimes the hands-down best way to tell when your plants are getting too much or not enough moisture.
Do you see yellow leaves or wilting stalks? Is the soil surface around the base of the plant slick or slimy or - worse - stinky? These are often signs that the roots are drowning in moisture.
Is the soil surrounding the base of a plant dry, cracked, more like a desert than an oasis? Some plants like this but most can only endure, hoping that the signs of moisture-depletion are seen, noticed and quickly remedied.
By using these tips and tools and getting to know each plant individually, you can begin to feel truly confident in caring for your lawn and garden as a whole while tending to each plant's needs.

Fall Landscaping: Getting Your Garden Ready for Winter
Summer is on its way out, and fall is fast on its heels. Cooler temperatures and shorter days are becoming the norm, which means that the growing season is just about over. You may still have a few crops that are thriving and continuing to grow, but most of your plants are slowing down and dying.
Now is the time to get your garden ready for winter and do some fall landscaping.
Getting Your Garden Ready for Winter
Many people believe that cold temperatures are what bring plant growth to a halt during this time of year, but it actually has to do with the amount of daylight each day has.
Thus, even if you live in a temperate climate, you will see your plants slow down and/or stop producing. This is the time when you need to get your garden ready and do some fall landscaping. Below are some tips on how to do that.
Get Rid of Old Plant Growth
If you still have some plants that are producing, feel free to leave these until they are finished. If you have other plants that are spent and they are turning brown and dying, remove these from your garden. How you dispose of them will depend. If you have a compost pile, they can be placed in there.
If you have any root crops such as carrots, parsnips, beets, rutabagas, or turnips, these can remain in the ground for longer than aboveground plants. However, you’ll want to harvest them before you do any of the work listed below in your garden.
If you have potatoes, these can also stay underground if you so choose. If you have any that are above the soil, you will need to remove them so that they don’t become food for insects or rot in the fall sun.
Prepare the Soil
Once all of the plant matter has been removed, you’ll then need to prepare your soil. This includes tilling it. This will expose any insects that might try to overwinter in your garden. Getting rid of them now during your fall landscaping will reduce issues with pests when spring rolls around again.
After the garden has been tilled, you can then add a layer of compost, aged manure, leaves, or lime (if needed). All of these items will protect the soil over the winter months, as well as add nutrients to the soil.
If you want, as part of your fall landscaping, you may plant some cover crops that thrive in the winter months. This would include winter rye, Stonehenge cabbage, Southern Giant mustard, broccoli, or frisee, among other choices. These will keep your soil protected and add nutrients so that it is ready for your crops next spring.
Take Care of the Weeds
When you remove the plants and till the soil, this should take care of most of the weeds that are also growing in the area. However, if you have some stubborn ones that have taken over a section of your garden, you might consider covering them with black plastic or cardboard.
You’ll want to leave this in place throughout the entire winter, right until you’re ready to plant again next spring. Covering the weeds and blocking the sun should kill the plants and reduce the number of sprouting seeds.
While you are outside working on your garden, you might also take some time to get the rest of your yard in fall shape. Below are some of the things you can do to make your house look amazing during the fall season.
Plant Trees and Shrubs
Fall is the best time to plant trees and shrubs. Locate a place in your yard where you want to place them, and then prepare the soil. Dig a hole large enough for the root base. You’ll also want to plant the shrubs and trees deep enough that the roots will be covered, but not so deep that they can’t get water. Give the plants some support so that they don’t get knocked over in any fall storms that might tear through the area.
Maintain Borders
Whether in your garden or in the flowerbeds around your home, now is a good time to ensure that plants are staying within their borders. If you have shrubs or flowers that are growing over their enclosure, take the time to trim them back. Now is also a good time to remove any dead foliage and weeds.
If the grass has been encroaching on your garden area, remove it when you remove the dead crops. Try not to till this into the soil, as you may inadvertently get seeds mixed in. If that happens, you’ll have to deal with a lot more grass in your garden when spring rolls around.
This is also a good time to inspect your trees and see if there are any dead branches. If so, take care of them so that they don’t break and fall over the winter. You may also consider doing the same for any bushes you have in your yard.
Clean the Leaves
If you have trees in your yard that are shedding their leaves, as part of your fall landscaping, rake these up. You can put them on your garden to help with soil nutrients, or you can place them in your compost pile or dispose of them properly.
As fall draws near, the growth of the plants in your garden and around your home will slow down or stop. To keep your landscaping looking amazing and to have your garden ready for next year, there are some things you’ll need to do, including removing dead plants and preparing the soil.

Easy Halloween Landscaping Ideas
Fall is here and natural leaf colors are nature's way of showing off her beauty. It is also time for Halloween. That does not mean everything has to be work and no play when it comes to Halloween landscaping.
Think about ways you can use lawn clean-up to have a little fun. Halloween is a great time of year to decorate your house and yard. Leaves can be used to fill "jack o' lantern" bags and straw bales bought for mulch can be stacked decorated with corn stalks.
Here are some fun ideas to consider when designing your Halloween landscaping. The sky's the limit but remember to use materials that will withstand weather changes such as rain and wind.
Pumpkins
Everyone loves pumpkins that become jack o' lanterns for the season. Carving is traditional, but you can also paint faces on them or use permanent markers to make fun or scary faces.
Create a pumpkin patch in the front yard by lining pumpkins in rows attaching them with a leafy plastic vine. Another suggestion is to decorate their faces with glow in the dark paint so their expressions only show at night.
Headstones
What Halloween landscaping would be complete without a graveyard? You can create illuminating stones that will glow after the sun goes down. Make a headstone mold using a plastic or a metal rectangular tray. Mix concrete, water, and illuminating powder (about 15% illuminating powder to the concrete powder) let set and decorate. Use paver bricks front and back to prop the headstone so they stand up.
Footsteps
If you have a sidewalk or steppingstones, some bloody footprints can give a chilling effect. Using an old shoe and some washable red paint, paint the bottom of the shoe and "walk" the red prints up the path to the door.
Glow in the dark paint would give a ghostly effect. You might want to add some drops of "blood" to create a more realistic effect.
Hands
Hands coming out of bushes, a grave, a straw bale, or a tree trunk can easily be made with plastic or latex gloves filled with dirt. With a little imagination and some paint, they can be decorated to look like a skeleton's hand.
Use masking tape to create the bone stencil to place on the gloves, use black spray paint on the gloves, then peel away the tape when the paint has dried.
Ghosts
Fluttering ghosts give a great Halloween landscaping effect, and they are easy to make. Using white trash bags as the body and blown-up balloons as the head, tie fishing line around the bottom of the balloon after inserting the "head" into the trash bag. Make a large loop of fishing line into the bag above the head as the hanger. Hang from trees, porches, or fence posts. If you want to decorate the faces, use a permanent marker or paint.
Smokey Bubbling Cauldron
If you have an old cauldron or large stew pot hanging around, Halloween is a good time to bring it out. Fill the cauldron halfway with hot water plus a small amount of dish soap. Using heavy-duty gloves or tongs, add some small pieces of dry ice to the cauldron. Mists of fog and bubbles will pour out of the pot. A word of caution: do not touch the dry ice with bare skin.
Bales of Straw
The straw bale can be used as the body of a sitting scarecrow. Place the bale on end adding stakes to secure it. Set a jack o' lantern on top as the head on the bale. Place an old shirt around the upper part of the bale as well as placing a pair of old pants around the bottom of the bale. Stuff the arms of the shirt and the pant legs with dried corn stalks. Add an old hat to the top of the jack o' lantern and secure.
Mummy Style Door Decoration
All it takes is a roll or two of white crepe paper, a sheet of black construction paper, one sheet of black construction paper, some tape, and a pair of scissors to convert your door. Wrap your door with the crepe paper to look like it is bandaged. Using the pieces of construction paper, make eyes and attach them to the upper part of the bandaged door. On Halloween night, play scary laughter sounds coming from behind the door.
Lighted Walkway
Fall is the season for mums. Why not line your walkway with potted mums and use mini lights to light the way. String the lights through the mums and for added effect, place "cobwebs" lightly over the top of the flowers. You may even be inspired to add some lightweight plastic spiders.
Create your own Halloween layout using a combination of these easy design elements. As a reminder, fall is the time to prepare your landscape for the winter season.

Fruit Trees You Should Plant in Your Garden
Creating a space to grow your own fruit becomes increasingly popular as people realize the numerous benefits. When you raise your own fruits, you know exactly how they have been grown and can control the chemicals used on them.
In addition to the obvious benefit of fewer chemicals than commercially grown fruit, home-grown fruit usually is more flavorful and tastes better. Most fruit trees are also visually pleasing and add a delicious smell to your outdoor space.
Planting fruit trees could even increase your home’s value. When choosing the type of fruit trees, you must think about many factors, not just what types of fruit you enjoy. Some fruits trees you could plant in your backyard for your next landscaping project include:
Plum Tree
For a small tree, the plum tree tends to bear lots of fruit. Planting one in your lawn will not take up as much room as most other fruit trees, but you will still be able to enjoy its delicious produce.
Generally, plum trees begin to produce fruit four to six years after being planted. They require pruning, and the right climate to bear fruit. Most varieties are self-fertile, meaning they do not need another plant with which to cross-pollinate. However, you should research the specific variety you plan to purchase.
Also, you might consider consulting with a professional gardener or landscaper. These compact producers survive best when planted during the winter. This time frame allows them to become firmly established in the ground before growing buds in the spring.
Cherry Tree
While having a cherry tree might seem unusual at first, the fruit can be used for a variety of recipes or eaten straight from the tree! They also produce beautiful blossoms each spring, as evidenced by the numerous paintings and pictures of them! These beautiful, unique trees will soon become conversation starters. They also blend in well with landscaping.
As with plum trees, make sure you purchase self-fertile ones. One concern with cherry trees is flying birds and insects. These creatures naturally love cherries! Research natural methods to keep insects away. You may also want to consider screens during certain seasons.
Over 97% of sweet cherries grow in California, Washington, and Oregon because the cherries do flourish in this climate. Cherry trees usually start producing within four to seven years of being transplanted. However, some varieties produce sooner.
Peach Tree
Most people think of the deliciousness of the fruit when they think of peach trees. However, there is more to them than the taste!
The colors of peaches contrasted with the green of the tree make a beautiful addition to any outdoor space. The yellows, oranges, and reds pop and almost look like flowers. After your neighbors get over the beauty of your fruit tree, they will want to sample your fruit.
Most peach trees are self-fertile. These types grow well in California. Peach trees do require some maintenance such as adequate watering during the summer and fruit thinning. They produce fruit relatively fast and can take as little as 3-5 months to bear fruit if planted from a graft. You should harvest your delicious peaches in mid to late summer.
Apple Tree
Most people automatically think of apples when you mention fruit trees. These trees often present a challenge for gardeners and can be exciting to grow. Nothing makes fruit taste better than knowing the effort put into a harvest!
A seedling tree will produce fruit in about six to ten years. You can reduce this time by carefully choosing the breed of the apple tree you plant. Most apple trees require another tree for cross-pollination.
Consult your local nursery or gardening expert to learn more about which varieties require cross-pollination and purchase accordingly. Imagine a pair of them lining your driveway!
You should also consider how the sun falls on your lawn. Lots of sun is essential for all apple trees. These fruit trees need good drainage too. You may consider adding or changing your landscape to improve your drainage. Like the cherry tree, apple trees produce beautiful spring blossoms that will later turn into apples.
Design and Maintenance
The key to a beautiful garden that produces quality fruit for you to enjoy is design and maintenance. First, you must be willing to put time and effort into your landscape. Finding the right variety of tree for your area takes research.
Most people will have better luck and enjoy their garden more if they consult a professional during the design phase. When speaking to a professional, or doing research on your own, you must choose the locations for your trees based on the needs of each plant. Aesthetics should always be thought of after the needs of the plants, not before. If you know you want a tree in a specific place in your outdoor space, find a plant that will flourish in the space. Avoid making the mistake of thinking any plant will work there.
Also, consider the accessibility of your plants. When it needs to be pruned or staked, will you be able to easily get around it? Each type of fruit tree has different needs. Some need to be staked to grow tall and strong. Others need lots of space to grow and spread their limbs. Others are climbers and need a trellis or other wall structure on which to grow.
After you have decided on the design of your outdoor space, you can get to work! In order to do so, you will need some commonly used tools. For example rakes, shovels, a wheelbarrow, and gloves make work easier, faster, and less frustrating. Use these tools to prepare the soil and plant your trees. Pay attention to the directions given with each tree and follow them precisely.

Dangerous Plants Hiding in Your Backyard
If you are like most people, working in your garden is relaxing. But what if it could also be dangerous? As it turns out, there are actually quite a few plants that could potentially be hazardous for your health. They may be growing right in your own backyard. It is even possible that you planted them there yourself, in pursuit of a beautiful backyard landscaping project.
Most Common Hazardous Plants
Poison Ivy is one of the most widely found plants, yet one of the most hazardous. Nearly every gardener has at least heard of it. It generally causes an itchy rash that may or may not require medical attention, depending on the level of exposure and your tolerance to the plant. It is best to avoid this poison ivy whenever possible any time you are working on your landscape maintenance.
The American pokeweed is also a very common plant found nearly nationwide. Unfortunately, the dark purple/blackberries that grow on this plant are poisonous, especially for small children. Ingesting them can make you very ill.
Tulips, daffodils, hydrangea, wisteria, and rhododendron are all plants that are commonly found in gardens and backyards because they produce beautiful and colorful flowers. However, each of these plants can be very dangerous if they are ingested by people or animals. This may not be enough of a reason to want to get rid of all of them. If you have no concern of a person or animal ingesting something from your landscaping, then it would not matter if these are present.
These plants are all quite beautiful and are often used in lawn and garden maintenance or design, to create areas of bright colors. Other examples of hazardous plants include:
- Oleander
- Rosary Pea
- White Snakeroot
- Deadly Nightshade
- Water Hemlock
- Rhubarb
- Foxglove
- Dieffenbachia
- Yew
- Philodendron
- Devil's Helmet
- Angel's Trumpet
If you have small children or pets that play and spend time in your yard, it is very important to ensure that you do not have these plants in an easily accessible area. For many of these hazardous plants, a significant amount of the plant has to be ingested for it to pose any kind of problem. In the case of rhubarb, for example, a person would need to eat around twelve pounds of the leaves in order for it to really make them sick.
Some of the other plants are extremely toxic and can make a person ill even in very small amounts. Deadly nightshade is, of course, one example, but so is the lily of the valley and foxglove plants.
Some of these plants do not even have to be ingested in order to make a person very ill. Deadly nightshade can cause skin irritation by simply touching it. The devil's helmet plant is beautiful, but it has been known to be deadly from just touching it.
What Should You Do To Protect Your Family and Pets
Pictures of all of these plants can be found online. It would be a good idea to familiarize yourself with their appearance. This will allow you to identify any of these potentially dangerous plants that may be in your backyard or garden. Then you can decide if you want them removed or if you are comfortable with their location.
In some cases, the plant may not pose any kind of threat, particularly if everyone that comes into your yard knows not to eat anything that they may find. For example, with tulips, the bulb is the most hazardous part of the plant, so as long as no one will be digging up your tulip bulbs and eating them, everyone will be perfectly safe.
If you decide that you would be more comfortable removing a hazardous plant, landscaping companies are best suited to help you with a safe removal, particularly when it comes to some of the more deadly varieties of plants.
This is especially true with those plants that can be dangerous or deadly simply from coming into contact with your skin; a professional will be much better suited to handle the removal, as they will be aware of the potential hazards of the plant and have the necessary equipment to safely remove and dispose of it. Sometimes simply pulling it and putting it in a trash bag or composting it can be just as dangerous as leaving it in your yard.