
Preparing for Wildfire Season - Part 1 of 4
Growing in occurrence, size and concern, California wildfires are heating up for the summer. Paired with one of the driest “wet” seasons we’ve had on the Central Coast in years, the threat of flames roar high and wide as we make our way into the thick of 2021. We’re finding that wildfire-prone areas are expanding past rural locations and can quickly spread into city limits. This growing susceptibility increases everyone’s responsibility to prepare and maintain their property for fire safety. CalFire has already fought hard to extinguish over 3,400 wildfires that have burned around 19,000 acres this year, and its just the start. They are predicting an ever heavier fire season for 2021. With community focus shifting from lockdown to summer travel, it’s important to prepare your property now.
Fire-safe landscapes are not just about upkeep, it’s an entire design, build and maintenance mindset for homes and businesses in high-risk areas. Protect your home and community by developing and maintaining the landscaping on your property with these safety regulations.
Creating a defensible space
To slow down or stop the spread of a fire reaching your home, a buffer needs to be put in place. This means deliberately clearing out the dead vegetation that surrounds your building, as well as consciously designing the layout. In accordance with state law, 100 feet of defensible spacing is required for all structures and homes. As explained by Cal Fire (readyforwildfire.org/prepare-for-wildfire/get-ready/defensible-space/) the design of this defense is made up of several zones.
Zone 0: With the passing of Assembly Bill 3074 in 2020, a “Zone 0” was created which will require the board of forestry and fire prevention to create new regulation around a “no ember zone” which is within 0-5’ of any structure or home by 2023. The good news is there is already a lot of information on this Zone that we can use to be proactive in our fight for fire prevention. Although this is not yet required by law, science has shown this Zone to be critical when defending a home against wildfire.
Zone 1: 30 feet of “Lean, Clean & Green.” This first perimeter of defense includes keeping tree branches 10 feet apart, removing dry needles and leaves from your roof, rain gutters or yard, and clearing out all dead weeds, grass or plants. Wood piles should also be relocated out of Zone 1 and into Zone 2. It’s also important to remove any trees or branches that are within 5’ of your structure to prevent the fire from easily jumping to your house or building.
Zone 2: 30-100 feet of “Reduced Fuel.” The second zone requires both horizontal and vertical spacing between grass, trees and shrubs. Grass should also be mowed or cut down to a maximum 4-inch height. Prevent a vertical “fire ladder” by ensuring all large trees have a 6-foot clearance of plants below. When mapping out plant and tree horizontal spaces, note that the size of the plants and the steepness of the slope will also determine the distance required between them.
Fire-Resistant Plants & Landscaping
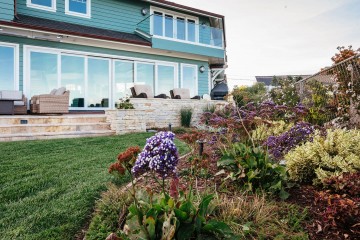
In addition to upkeeping your land with fire-safe protocols, choose specific materials and plants that are more resistant to fueling fire. No plant is fireproof, but certain types that retain moisture and grow close to the ground are safer options. A bonus is several of these plants can also be drought tolerant, so you’ll be saving water as well. Strategic placement and spacing is important to consider; the further away from each other, the better. Construct walls, decks and patios in a way that will create a line of resistance to fire. These seemingly small landscaping changes can make a big difference in your home’s battle against deadly flames. If you can build walls out of concrete stone or metal and protect the underside of all decks with metal screening to prevent embers from blowing under.
We live in one of the most fire susceptible communities in the Golden State and educating ourselves and our fellow neighbors on preventative measures is now more imperative than ever. Achieving a landscape that is both fire retardant and dazzling in appearance is possible.
The most important part of fire-safe landscaping is being cognizant of your current situation and taking decisive action to improve it. If you need help complying with defensible space standards or installing a landscape that promotes fire safety, reach out to Cal Fire, your local landscaping company, a landscape architect or consulting arborist.
Check back next week for Preparing for Wildfire Season, Part Two which will dive deeper into alternative options you can use in your landscaping and adaptations you can make around the zones of your home to increase fire-safety.

Controller Programming
Installing, navigating and maintaining an irrigation controller can be a job all in itself. I receive dozens of phone calls every week on “how to program my controller”, “my controller isn’t programmed right” or “my sprinklers are coming on during the day”, etc. Flow through the following to better understand how your controller works and why its beneficial for your landscaping, your wallet and water conservation.
What is a controller?
A controller is the device, or electronical “clock”, that operates an irrigation system with intended frequency, duration and start times. It plugs into a 120 volt outlet on the outside of your home or in your garage. Most systems typically have 12-14-gauge wires that run from the controller to each one of the valves. It sends a low amount of voltage, (between 12-14 volts), to operate a solenoid which then actuates and opens the electric valve. Water pressure is built up in the valve at all times, so once that signal is received, the solenoid opens and pressurizes the sprinkler or drip system. Once the electronic current stops, the solenoid closes which in turn closes your irrigation valve and stops the flow.
How should it be scheduled?
Determining how you should program your controller depends on may factors, including soil type, plant type, sun exposure, irrigation delivery system and exterior humidity. Sandy soil typically needs a schedule with shorter amounts of duration, but with more frequency. A clay soil usually does better with one start time. For example, a clay ground may need to run for 6 minutes total, while the sandy soil program switches between running for 3 minutes, then waiting 20 minutes, then running for 3 minutes again. This start-soak cycle lets the water penetrate into the ground without causing flooding and can be set up by adding multiple start times on your controller.
The best way to know how long to water your soil before it floods is to turn your sprinkler valve on and monitor it closely. Once water starts to puddle up and flow off your lawn, you’ll know you have reached full capacity of what it can take in that period of time. For example, say at minute 7, water started running onto the sidewalk, so now you know you shouldn’t run that irrigation valve for more than 7 minutes at a time. Depending on how much water that sprinkler puts out, and how much water your lawn needs, you may find that 14 minutes per cycle, 3 days a week is the necessary amount. Your plan should be to set the controller to start at 10:00 pm for 7 minutes and then again at 2:00 am for 7 mins. This will accomplish the total 14 minute requirement run time but gives the soil the chance to soak up the previous water before applying the second. If you were to run the valve for 14 minutes straight, theoretically you’d be wasting half of that water because it would puddle up and run off.
What type of system do I have?
Sprinklers: Sprinkler systems use an overhead type of application where the water is dispersed by spaying out of a sprinkler head. Some sprinklers put out water slowly like a MP rotator (at 3 gallons/minute), while some put out really quickly like I20 sprinklers you would see on baseball field, (at 15 gallons/minute). Its critical in knowing the difference of precipitation rates and gallon/minute flow in order to adjust your system properly, in combination of knowing what type of sprinkler system you have.
Drip Systems: Drip systems utilize ½” flexible piping with small emitters to apply water directly to the plant root system. These types of systems tend to be the most common in recent years as they do not waste as much water as sprinklers. The challenge with these though, is that it is hard to see leaks and difficult to know if they are on or off. Drip emitters can range from 1 gallon per hour to 5 gallons per hour so it’s important to put the right emitters on the right plants. Once you have the system installed correctly you can then calculate how much water each plant should receive and program your controller accordingly. Most drip systems will run 20-30 minutes per cycle at 3 times per week.
Tree Bubbler System: Tree bubbler irrigation is similar to a cross between sprinklers and a drip system. While drip systems can give out 1 gallon per hour, many tree bubblers can give out 1 gallon per minute. This is a 60x higher amount of water release difference, so it’s very important to know your system. Most tree bubblers are installed in tubes or right at the surface, so its often hard to observe the system when it’s on. Most bubbler systems should run for 5-7 minutes and on a cycle of only 1-2 times per week. Trees like deep watering on an infrequent basis, whereas a lawn prefers shallow watering more often.
Don’t be afraid to do a little “digging” into your irrigation system and discover the ideal set up for your controller. It’s so important to understand what kind of application system you have and what type of delivery system you’re running. At the end of the day listen to your landscaping, it will give you indications of over- or under-watering. In general, the majority of landscapes are overwatered, so before you add time to your controller make sure to dig around your struggling plants to check the moisture content. If it’s damp, you are probably overwatering.
As we head into the Stage 1 Drought Restrictions for Santa Cruz County, reducing your landscaping water use by up to 30% will greatly contribute to your overall savings!
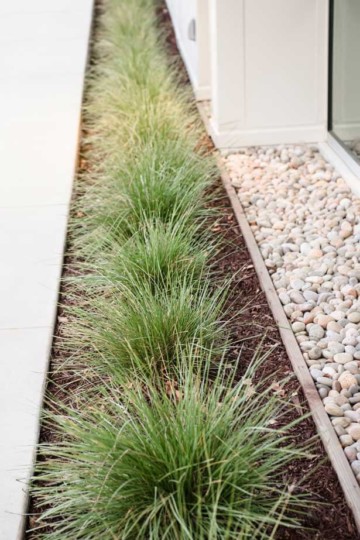
No-Mow and Ornamental Grasses
As the desire for less maintenance and more drought-tolerant landscaping increases, ornamental grasses are growing in popularity. With so many varieties, its easy to find the right color, size and texture for the needs of any outdoor space. As their name suggests, these decorative plants are a terrific option for sprucing up a yard, patio or outside area. Need more convincing? Ornamental grasses are resilient to a range of temperatures, are deer-resistant, rarely attract pests and their deep roots can help stabilize slopes to prevent soil erosion.
Ornamental grasses (OG) add texture to your landscaping and make exciting additions to borders and gardens. Try planting several types together like feathergrass, fountain grass and blue fescue to create eye catching designs. Or mix grasses in with other plants like lavender, succulents and hydrangea to forge a melody of colors and patterns. Use the same grass in different locations throughout your yard to add unity and tie it all together.
This fluffy foliage will also soften and breakup the harshness of hardscapes. Blending an OG with surrounding stone or concrete features will bring an aesthetic balance to your landscaping. On a smaller scale, put types like Elijah Blue fescue or Juncus grasses into pots or containers that can be moved around as desired. Overflowing by design, the wind will whistle through their swaying blades and garnish your outdoor space with movement that brings it to life.
OG make wonderful ground cover, especially in comparison to a traditional lawn. Requiring much less maintenance, they also help keep out weeds and maintain their visual attraction year-round. In these areas I would recommend “no-mow” grass. It usually consists of a special blend of native fescue grasses that grow up to about 6” tall and then fall over giving it a meadow-type look that does not require mowing. Once established, these grasses use little to no water and can give the appearance of a lawn or green area in your garden. Certain types will need routine “haircuts” to help trim down overgrowth and allow for fresh blades to liven up the plant.
One of the most popular OG, Calamagrostis foliosa (Mendocino Reed Grass) is a California native and does great in almost any soil or sunlight. They are small, require very little trimming and make great accent plants in your garden. Adding some boulders to your garden is another easy way to take up space without adding water requirements, and they go great with OGs!
Complimentary to any form of landscaping, ornamental grasses will provide a unique appearance for your exterior space, while cutting down on cost and leaving you with more time to enjoy your outdoors!
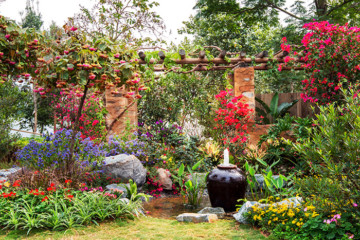
Keep your landscaping colorful year round with these blooms
For most regions within California, the winter and fall seasons can seem dreary and dull. Leaves vanish from trees, most plants halt blossoming and the skies turn grey. But what if you could enjoy some color in your yard all year round? Though most perennial flowers typically have a blooming season, there are a few varieties that still show off through the gloomier months. Extend the colorful joys of spring and summer by planting these off-season bloomers into your landscaping.
Coneflowers
Available in hues of orange, red, purple, pink, green and white, coneflowers come in a variety of both colors and sizes. It is easy to grow and known to be drought tolerant. To keep its flowers blossoming throughout multiple seasons, make sure it gets adequate sunlight and not too much shade. Deadhead some of the flowers in early summer to ensure plenty of new growth come fall. Coneflowers are also great nectar plants for attracting butterflies!
Sedum
This plant shines its brightest in autumn as the color in its flowers increases as temperatures lower. Come late fall, sedum foliage can be green, purple or variegated and even some varieties turn red, orange or yellow. Adaptable and steady, sedum is a beautiful addition to any garden or outdoor space.
Perennial Geraniums
There are multiple species of geraniums, but some types can luster through fall and even winter. It also comes in a range of pigments including white, peach, red, orange, purple and even bi-colors. Easy to care for, geraniums do well in containers, as ground cover or garden borders. Resistant to disease and pests, you’ll be admiring its charm for most the year.
Twinspur / Diascia
Cousin to the snapdragon, twinspur (also known as diascia), does well during the colder seasons. It loves the sun and does best in areas of moist soil, but good drainage. This ornamental plant can bloom with flowers in shades of white, purple, pink and orange, all with a yellow contrasting middle. Designed with two oil spurs, diascia flowers are the specifically pollinated by Rediviva bees.
April showers don’t have to only bring May flowers! Plant some of these “late bloomers” in your landscaping to keep natural beauty abundant throughout the whole year!
Environment ally additions for your landscaping
As landscapers, the great outdoors is our sacred realm and we hold a responsibility to help take care of it. Gardening and land management may be a remedial hobby for some, but it can also be a practical avenue for contributing back to the environment. Producing more green materials will help purify the air, reduce pollution and generate pollination, resulting in a happier, cleaner planet. There are so many types of beneficial plants and trees that encourage the health of our earth, but here are just a few favorites that do well in our Central Coast climate. Consider including more of these “green” options when planning your next outdoor space.
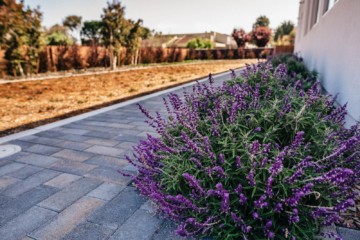
Lavender
Fragrant and beautiful, lavender is a lush addition to any home or garden. It attracts beneficial insects, butterflies and bees, making it a valuable choice for pollination. Place this purple-flowered plant close to gardens where bees and other pollinators won’t be able to resist its charm. The herb is also well known for its medicinal benefits including soothing, calming and healing properties. Resilient to warmer climates, lavender thrives here in California and is easy to maintain, requiring mostly just sun and proper drainage.
Eucalyptus Tree
The bigger the “plant”, the more carbon dioxide it can take in and thus the more oxygen it can release back into the air. Trees make a big and tall impact on helping our environment, so its crucial we continue to care for and grow these giant friends. Near the top of the carbon dioxide absorber’s list are eucalyptus trees which store approximately 70 pounds of CO2 per year! Implanted to the Santa Cruz area in the late 1800’s, eucalyptus have become one of the most common trees along our coastline.
Coast Redwood
This infamous western tree is a great addition to any California dwelling. Redwoods, known as the tallest trees on earth, can soar up to 350 feet in the wild and average a 600 year life-span. Surpassing the eucalyptus, studies have shown that redwoods seize more carbon dioxide from power plants, cars and trucks than any other type of tree on earth. The more CO2 they devour, the more they help combat climate change and improve our breathing air.
Trees can also contribute to air quality by providing shady surfaces and cooler temperatures. If a home or building has shade assistance from surrounding trees, it can reduce the need for conventional air conditioning and the gas emissions that come with it.
Even though Earth Day may have just passed, don’t let that stop you from making an impact throughout the whole year. Contribute to our ecosystem by making conscious landscaping choices that will benefit our earth for years to come!
Driveway Decisions
Just because a driveway needs to be functional, doesn’t mean it can’t contribute creatively to your landscape. The driveway takes up a large portion of front yard real estate and overall look of your home. Get rid of that cracked asphalt and dress up your curb appeal. Drive through these ideas on how you can mix practicality with charm for a unique driveway design.
Concrete
A popular selection, concrete driveways combine durability with low cost. Though less difficult to maintain, they can stain easily so watch out for oil drips and spills. A concrete driveway can clean up the front entrance of your home and while still producing a high-end appearance. If concrete makes the most sense for your budget, there are several ways you can spruce it up. Add sealant stains to give it a different color, stamp it with decorative designs, or impression it with texture.
Pavers
While pavers may be more expensive up front than other materials, they can last for multiple decades if installed correctly. The most versatile in terms of design options, pavers can really enhance curb appeal. The color, pattern and size of the pavers can complement many different types of architecture. They can be permeable or sealed depending on your drainage situation. Permeable pavers allow water to flow through the cracks in the pavers and into an underground storage vault. Pavers can not only improve the presentation of your home but add to the sustainability as the maintenance and repair costs are minimal.
Gravel
Gravel is one of the most budget-friendly options for a driveway, but it does require regrading maintenance every few years. It can be a smart choice for long driveways or country homes on large properties. There are some tradeoffs when it comes to gravel, (like tracking it into your house), so make sure you know how it will affect your living space.
Asphalt
One of the most common driveway hardscapes is asphalt. We’ve all seen the brand new asphalt driveway that looks clean and sharp but after a few months, and most definitely a few years, the asphalt begins to fade and crack. Although this can be a low-cost option it usually requires resealing and a lot of maintenance over the years.
If space permits, designing the driveway in a circular, or half-circular layout can give your anterior a convenient upgrade. It forms a much easier passage for vehicles while also giving your entrance a cohesive design flow. What can be really eye-catching is combining several of the above elements together. In between pavers you can add in softscapes like artificial turf to soften up the appearance, shaping a very inviting approach.
No matter which material works best for your budget and home, incorporate your driveway into your landscaping design to give your residence an attractive, and useful, upgrade!

Reduce your water bill with conscious landscaping
Santa Cruz’s wet season wasn’t very wet at all. In fact, we are coming off of the driest wet season Santa Cruz has endured in seven years. As of this week, the Santa Cruz Water Commission has sent its recommendation to City Council to enact Stage 1 of the city’s Water Shortage Contingency Plan. If this passes, that will mean a 10% water usage reduction for its residences. What’s one of the easiest ways to have an impactful cutback on your home’s water usage? Smart landscaping!
Irrigation Management and Water Management
Most people are actually overwatering their plants. One way to know if you’re accidentally making the same mistake? Watering your landscape to the point the water pools or runs off. If this is happening, you’ll need to manage the run times on your controller. Make sure you are checking and adjusting these monthly as the weather and seasons change.
Another important watering factor is having the right irrigation for the right areas. While your lawn or trees may need a specific concentration, different flowers and plants will require less or more hydration. For example, changing out sprinklers to drip irrigation in shrub or plant areas can have a huge effect on your overall landscaping water consumption.
When mother nature does decide to grant us some rainfall, take advantage! Install a rain sensor on your controller to make sure you aren't watering during a rain event and wasting precious water.
An additional concern to watch out for is overspray onto hardscape services. Reduce the sprinkler reach where you can see wasted water on areas like decks, driveways and patios.
System Maintenance
An easy approach to cutting down on wasted H20 is changing out old sprinklers for new low-water-use heads such as MP rotators. These have a multi-trajectory rotating stream delivery system that are great for water conservation.
Additionally, make sure there are no minor leaks in your system, such as a sprinkler head leaking from the seal.
Plant & Lawn Maintenance
By keeping your plants and lawn in a continuously healthy state, they won’t need large amounts of water. With routine care and maintenance, you can support your landscaping’s overall vitality with lower demand for water replenishment.
One way you can achieve a healthy grass is by aerating your lawn. This creates small reservoirs for the water to be stored in, making the most out of when it is watered.
A few of your plants may be established to the point of not needing supplemental irrigation, including many native and drought-tolerant plants. However, some may be on the same valve that do still need the water. If you can recognize which specific plants that no longer need supportive watering, you can close off those valves and cut down on your usage.
Water conservation will continue to be an important civic duty here in California. Do your part by staying conscious of your water usage, and what better way to start than with your landscaping!?
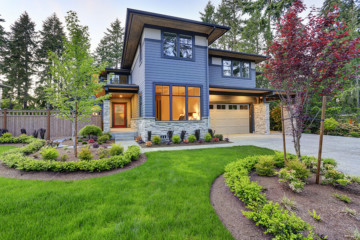
Don’t forget about the front yard
Enhancing your front outdoor space should be just as important as developing your back yard. Whether it adds curb appeal, welcomes guests or provides security, a thoughtfully landscaped front yard is a valuable to your home. Don’t know where to start? Comb through these tips to find inspiration on how to upgrade your anterior outdoor dwelling.
Pick the right path
Make your home’s entrance memorable, functional and to the point by creating a clear walkway. An entry path should be easily recognized and convenient to follow. You don’t want mail carriers, delivery drivers or guests trampling through your freshly planted flowers or manicured lawn trying to get to the front door. Besides providing a safe and designated avenue, adding paths and walkways can bring an appealing visual element to your landscaping. Some common options include flagstone, cobblestones, decomposed granite, concrete, wood decking, brick, steppingstones or even a combination of the few.
Focal point
Without a focal point, your landscaping’s design could be lackluster and may leave the eye without a direction to land. Depending on the size of your yard, a focal point can be many different things - a large tree, sculpture, fountain, garden bed, or even just the front door. Build your landscaping layout to encompass around this feature and support it with the use of color, sizing and textures in your remaining elements.
Privacy where it matters
If you live on a busy street, or just have nosey neighbors, privacy in your front yard can be hard to come by, but you do have some options. Hedges, bamboo and ornamental grasses are helpful green additions to your landscaping that aren’t as obvious as a chunky metal fence. Slated or gapped fences and trellises can also give a great balance between privacy and intended invitation. If surrounding neighbor homes have a direct view into your space, cascading landscapes can provide a perimeter barrier while giving your yard some creative dimension. If you install bamboo, make sure to include root barriers which will avoid unintended spread.
Conceal or reveal?
While privacy may not be an issue for you, maybe it’s the presence of unavoidable eye sores on your property. Conceal unsightly features like AC units, trash cans, hoses or power boxes as an easy way to clean up the aesthetic of your anterior area. Mini sheds, lattice, wood boxes or tall plants are fairly simple and cost effective options for camouflaging what you don’t need seen. Out of sight, out of mind!
Lighting
Boost visibility and safety while transforming your yard from dark and dull to dazzling and glowing. Up-light trees or focal points, guide paths and walkways or brighten up your lounging patio with mood setters. From LEDs to solar, there are a wide range of lighting options that could help illuminate your front yard without eclipsing your budget.
Protection
Installing motion detector lights is another useful addition to your front yard. Warn off burglars or startle away unwanted critters. Take it a step further by putting in a security camera system and you’ll have real-time peace of mind whenever you can’t be at home. There are also motion sensor sprinklers if you want to chase off those unwanted racoons and skunks.
Ground cover
There are many eco-friendly ground covers that you can utilize in your landscaping besides grass. Explore low maintenance alternatives like creeping thyme, clover, ornamental grasses, native perennials or even artificial turf. For even more ideas, check out my previous Landscaping Lesson on Xeriscaping and how you could build a water efficient, climate-happy front yard for your home.
Above all, create a space that encourages outdoor community and evokes enjoyment. Catch sunsets on a porch patio set or sway in a hammock while catching up with nearby neighbors. The front yard is the entrance to your home and should reflect the same warmth and care you carry for it on the inside.
Why are my plants yellow?
Just as a street sign or traffic light signal alerts you to heed with caution, cues can present themselves in your landscaping too. Universal warning signs or labels are often colored bright yellow in order to catch your eye, and nature is no different. If you’re finding that plants and greenery on your property are turning yellow, (also known as chlorosis,) it could be mother nature’s notification that something is off balance.
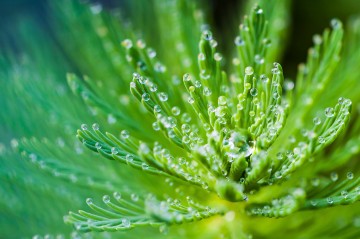
Thirsty or Waterlogged?
The most common stressors for a plant are water related - either too much or too little. Starve the plant of moisture it will drain the green out of its now crunchy, curled limbs. Drown the roots by over-saturating and the leaves will become yellow and limp while the plant struggles to deliver vital nutrients. Check your property for drainage issues; are certain areas flooding or pooling? Inspect your sprinklers and irrigation; any leaks or blockages preventing adequate hydration? Many native plants in our area are drought-tolerant and won’t require additional watering during these spring shower months but be sure to adjust once summer’s warm weather arrives.
Lighting & Temperature
Photosynthesis - in simple terms, it’s the process by which plants utilize sunlight to generate food. Without enough access to sun, many species of plants will starve. Consider giving your indoor plants a happy hour every week under the sun, or transplant outdoor greenery to areas not sun-blocked by structures and trees. Re-positioning may also help with temperature problems, as both freezing and blistering degrees can affect your plant’s “homeostasis”. Avoid placements near heaters or air conditioners and be aware of weather changes for outside plants.
Soil Conditions
Its early spring here in Santa Cruz and many rain showers have already come and went, impacting the ground beneath us. Environment is crucial for a plant’s survival, but more specifically, its intimate soil habitat. Too much rain can lead to nutrient loss due to water runoff and leaching. Bright yellow plants are a key indication of nutritional deficiency. Fertilize with products that contain potassium, nitrogen, phosphorus, calcium, sulfur and magnesium, just 6 of the 13 essential minerals craved by plants. Conduct a soil test to determine which nutrients are missing out of our plant diet.
Disease & Pests
Keeping plants healthy and happy also requires protecting them from predators and disease. If you know sunlight, temperature, nutrients or ample water aren’t the issue, it could be a harmful new tenant. In addition to yellowing, check the leaves for tiny holes where insects may have indulged. If no hungry pests are present, it could be a fungus or disease. Be sure to manage the soil appropriately to avoid creating fungus-loving moisture or try a DIY organic pesticide if insects are eating away at your plants.
Plants crave balance, so when the equilibrium sways too far in either direction, watch for the hints that nature will provide to let you know something is awry. Green means go, yellow means slow!
What you need to know about treated wood waste
With any element in your landscaping, whether it’s a bed of perennials, a stamped concrete driveway or a lush green lawn, your hope is for its longevity. While treated wood (TW) may seem like a helpful choice for weathering climate vulnerability on your property, its cons may outweigh the pros. Whether you are a homeowner, contractor, transporter or simply helping out a friend, application of the new TWW regulations will affect you differently, so use this article as a primer before doing some additional research.
What is TWW?
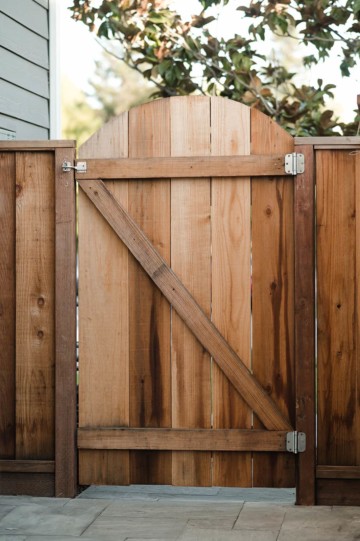
TWW refers to any lumber that has been chemically treated to protect against rot and insects. The most common type of TWW, and a name you may be familiar with is, “pressure treated” wood. The process entails placing the wood inside a depressurized tank to remove any air and then infusing it with chemical preservatives. Pressure treated wood is frequently used in areas with high moisture or insect populations like decks, picnic tables or fence posts.
What Changed?
As of December 31, 2020, a long-standing CA State Health and Safety Code (CA-HSC 25150.7) expired. This expiration means that all TWW is considered hazardous and must be disposed at a Class I hazardous waste landfill. Some of you may have already ran into this frustrating situation where you go to dispose of wood waste at the dump and you are turned away. For others, my hope is that this article can help save you some time and money by being prepared and educated on how to handle your TWW.
How do I know if my wood has been chemically treated?
TW can often be recognized visually. According to the DTSC fact sheet, some signs to look for include:
- Treated wood end tag (with information regarding the preservative used)
- Wood manufacturer stamp codes
- Indentations on the surface of the wood
- When cut, staining is visible around the perimeter only
- Discoloration (e.g. green or dark brown appearance)
- Odor Treated wood may also have an end tag
How do I dispose of TWW?
Instead of your usual local dump, TWW can only be dropped at an authorized hazardous waste landfill. As of March 2, 2021, the DTSC has posted an updated list of landfill locations that will accept TWW, which can be found here. Many of these landfills have different acceptance requirements, like a pre-approved waste profile, so it is recommended to call ahead. Currently, there are no dump sites in Santa Cruz County. There are some locations in San Jose, but again, call first to ensure you are properly prepared.
Construction and demolition costs to increase
Due to the changing regulations, disposal fees are skyrocketing for contractors. Most have to transport the waste much farther which comes with increased costs. Be sure to inquire with your contractor during the interview regarding their company’s updated policies on TWW as this is a newly implemented order, and to budget appropriately for your next remodel.