5 Landscaping Resolutions for the New Year
Turn your renovations into resolutions!
A new year brings new opportunities, fresh ideas and changed habits. But what about your scenery, shouldn’t that also get an update? Your outdoor environment can be just as important as the inside of your home and it too deserves a revitalization. View the next 12 months as a clean slate for developing happier, healthier patterns in your life, starting with spending more time outside. Here are five landscaping resolutions you could adopt for 2021 that will encourage more open air activity.
1. Attainable additions
Winter is the ideal season to make landscaping plans. Since many plants will need time to establish their roots, build out your design now and choose which types of additions you would like to have flourishing by the time spring rolls around. Set your garden up for success by picking climate-appropriate plants that will not only survive but will last much longer. Lay down fresh mulch to areas that could use some sprucing up or add low maintenance, native plants that will be easy to care for. Try being conscious of items you could upcycle that you would normally discard as trash, like pallets, old wheel barrels, glass jars, etc., and instead incorporate them into your landscaping design. Be creative and efficient by using what you have at hand. Just switching up the layout or color scheme in your yard can sometimes be enough to give a needed renewal. It’s simple additions and changes like these that will have you and your family enjoying more time alfresco without making huge dents in your wallet or calendar.
2. Grow your own goals
Growing your own garden will reap many benefits. Not only will it require you to dedicate time outside tending to it, but you’ll be eating healthier and cutting down on grocery costs. There is something satisfying about seeding your own food, watching it grow and taking that first bite. With homegrown fresh fruits and vegetables, you’ll be starting off your year organically proud!
3. Dial in your drainage
We have yet to receive substantial rainfall this winter season, but I can assure you the storms are coming. It’s important to review and inspect your drainage system before the large downpours arrive. Do you have water under your house after the large rain event? It may be time to install a French drain to reduce water collection under your home. Another potential issue are clogged drain lines, leading to backups which can eventually flood your landscaped areas, or even worse, your home. Be sure to tighten up your drain system in the first month or two of the new year.
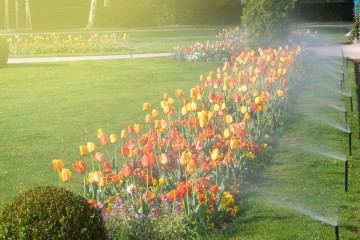
4. Invest in irrigation
If there’s only one area you choose to invest money into this year on your landscaping, let it be an irrigation system! As water conservation is becoming ever-increasingly important, having an irrigation program will be extremely beneficial. Drip irrigation systems reduce wasted water, allowing it to slowly trickle into needed zones. Technology is constantly evolving and there are now systems you can conveniently monitor through your phone or tablet. Smart controllers can even sense rainfall and soil conditions to automatically adjust the flow as needed. Another helpful feature is a flow sensor and master valve combination that will shut your irrigation off in the case of a leak and send you an alert – this is a must for your second home or if you travel often. The return on an irrigation investment is large, with water, time and money well-saved over the years to come.
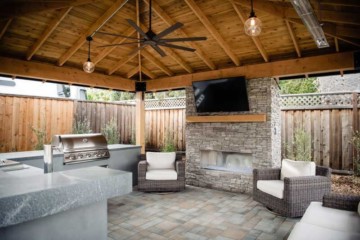
5. Bring the indoors outside
Make additional use of your yard and turn it into another room of your home. Take the inside outdoors by building a congregation or cooking area. With an outdoor fridge, sink, countertops, woodburning stove, BBQ and even a TV, you’ll have a functional, entertaining, outdoor space for you and your guests to utilize year round. Add a firepit for chilly evenings or find comfy furniture to host game nights. Whether it’s basking in the morning sunlight or under a star-filled sky, an outdoor “living room” will serve its purpose well throughout the year.
Above all, pledge to utilize your outdoors as much as possible. Vow to sip every Saturday morning coffee on your deck, dedicate your daily yoga under the sun, or promise to stargaze on your lawn once a month. Whatever it is that could encourage you to uncage yourself from indoors and take in more fresh oxygen, resolute to do more of that in 2021!
Caring for your outdoor wood features
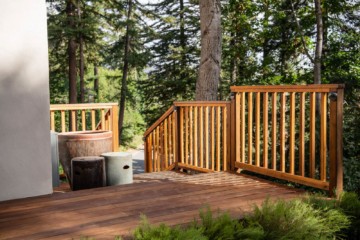
Almost all landscaping designs have some form of wood components, most commonly as fencing, decking, retaining walls, pergolas or garden beds. Even though timber is a naturally occurring element, its inhabitance as a hardscape will require routine care and maintenance just like the rest of your yard. Wood features face several outdoor enemies including harsh weather conditions, decay, rot, mold, fungi and even detrimental insects like termites. Protecting the wood in your landscape first begins with choosing the right type of lumber for your project. Redwood, Cedar, and Douglas fir are among the strongest choices for outdoor projects, but Redwood is going to be your best bet against rot and pest infestations. Pressure-treated timber also has its time and place created with preserving agents ingrained into it, it’s is a great option for retaining walls, stairs, posts and pathways. It has been modified to better withstand conditions like soil humidity, which helps shield against rot and water damage. Don’t make it hard on yourself by going against the grain, follow this guide to promote longevity for the wood pieces in your landscaping.
Routine inspections and repairs
Just as plants and flowers should be pruned, your wood features should be regularly inspected for damage or deterioration. Replace boards or beams that are significantly weakened or corroded. Rectify bulging screws and hammer back down protruding nails, while also checking that connection boards are secure and stable. Sand down surfaces that could inflict splinters, especially high traffic areas that are frequently walked on barefoot, like stairs and decks. If you have a wood retaining wall or fence that is buried underneath or up against the ground, it may be in consistent contact with wet soil, which can put a heavy strain on the wall, also causing major draining issues. It’s important to have proper drainage installed at the same time of a retaining wall to help avoid water induced rot or the compromising of its structure. Again, I recommend utilizing Redwood for any retaining walls that will be in direct contact with soil. Going a step further is also recommended by installing a barrier between the wood and the soil, this will help prevent an early retirement of your retaining wall.
Cleaning
Caring for your wood components also includes deep cleaning. First, remove all plants, furniture, rugs and other objects from the structure. Sweep or blow off any built up dirt and grime. Clean the wood both vertically and horizontally with the proper cleaning material while going against and with the grain. Cover all surfaces of the unit, including railings and support beams. If applying by hand, be sure to wear protection if using a cleaner that has harsh chemicals, (which many wood cleaners do). Depending on the type of cleaner, you may need to let it soak in and marinate for an extended amount of time, so be mindful of when you start this project. It’s then best to pressure wash the cleaner off. Be careful not to concentrate on one spot for too long as it can damage the wood. (Pressure washers burst out around 1,000 – 3,500 pounds of water per square inch!) After you’ve bathed the wood, it will need to completely dry before moving on to the final maintenance step.
Coating, sealing and staining
You’re not out of the forest just yet…finish off with the crucial phase of wood care: coating and sealing. Most natural wood features are treated with an oil-based preservative that aids in starving off mold, fungi and rot. But painting the wood can also help keep these out as it creates a non-permeable surface, plugging up pores, cracks and holes. Staining will darken the wood, while clear sealants will help maintain its natural color. Confirm that the wood is fully dry before applying a stain or sealant, or else you’ll be trapping in harmful moisture, leading to potential fungus or mold. There are endless amounts of sealer, coatings and paints you can use for your wood so be sure to consult a professional before starting your project. I recommend going to your local Ace Hardware, I have found the folks at Ace to be the most helpful and educated when taking on a DYI project like this. If you are going to hire a contractor take some time to do your own research and ensure their recommendations line up with those of other professionals. As always check to see if the contractor is licensed and insured before letting them come onto your property.
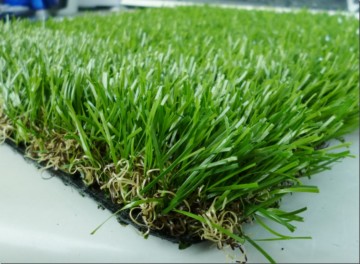
Artificial Turf: is the grass really greener on the other side?
Since its debut in 1966, artificial turf has been gaining ground within residential and commercial landscaping. Originally invented for indoor athletic fields that lacked the adequate sunlight needed for a natural lawn, it continues to grow in popularity of modern design.
Made from plastic polymers, the blades are sewn into a layered thatch and then infilled with a shock absorbing material like rubber or sand. Installation is similar to that of carpet; stretched flat with as little seams as possible and then secured around the perimeter. If done properly, several layers of additional material are planted underneath the turf: first a wire mesh, then 3-4 inches of base or drain rock with about 1 inch of washed sand or granite fines over the top of that, and lastly a weed barrier. This provides proper compaction and stabilization to keep your turf area from settling or becoming uneven over time, as well as protecting against weeds or pesky rodents.
The most common mistake I see in artificial turf installations is the lack of wire mesh and base rock. Installing the turf right over bare dirt will bring you nothing but long term problems. If you’re on the fence about whether artificial grass may be the right option for your outdoor space, rake through these pros and cons.
Drawbacks
There are several drawbacks that come with choosing a faux lawn. Even though some manufacturers use recycled materials, it is still made of plastic, unbiodegradable and will eventually be retired to a landfill. Secondly, artificiall turf is very expensive compared to a real lawn, most run between $12-$15/square foot which includes base material, labor and the cost of the turf. While the initial installation costs may be alarming to your wallet, most have a lifespan of 15-20 years, so if you can handle the upfront expense, the ROI is certainly there. Another disadvantage is that during hot days, the sun can heat up these plastic blankets to a scorching degree. Be conscious of areas that get constant, direct sunlight in the summer, especially if children or pets frequent these spots. More technology is coming out to keep turf cool in the summer months, but alternatively you can spray it with a hose to help cool it down. Though it is semi-permeable, artificial lawns won’t absorb animal waste like a natural grass and will require additional maintenance for debris and odors. While it doesn’t demand the traditional upkeep of a lawn, it will need to be regularly swept and sprayed down with a disinfectant to stay clean and sanitary. Innovation has also advanced in this area and newer turf options available have odor-wicking technology to help with this.
Positives
So, what makes this imitation sod desirable? One major attraction is how much water it saves. A natural lawn needs approximately 62 gallons per week of hydration for every 10×10 foot area. Over the course of 15 years, that’s a colossal amount of water conserved and maintenance time saved. Your average homeowner’s lawn is around 750 square feet, so over 15 years that equates to about 375,000 gallons of water. Besides its lack of thirst, synthetic lawns don’t require mowing, weeding or fertilizing, heavily freeing up your Saturday mornings.
The absence of harmful fertilizers is another eco-friendly tradeoff of fabricated lawns, but many argue that its plastic composition is just as bad for the environment. If you’ve battled against resilient rodents like gophers in your yard, you understand how valuable finding a solution to their never-ending hole digging can be. The wire mesh and weed barriers below will stop gophers abruptly in their tracks. Many people, and even pets, can be allergic to real grass so avoiding itchy outbreaks is another added bonus. Unlike a natural turf, artificial grass does not sit upon a bed of dirt, so pets and children won’t be tracking in mud and soot indoors. Many field-sport athletes have confessed they prefer playing on artificial turf over real lawn since the surface is more predictable and tackier.
Artificial grass is available in a variety of colors, textures and lengths, most of which will fool the average eye into believing its real. A final selling point? No matter the season or climate you live in, it always looks good and green, adding consistent value for both commercial and residential curb appeal.
If you’re not sure where you stand on artificial turf, consider a hybrid option for your landscaping. Keep a living lawn in desired areas where pets or children spend time and install artificial grass in portions of lower foot traffic like side yards. The decision to go fake may be more complex than what meets the eye, but just remember the grass really stays greener on the artificial side!

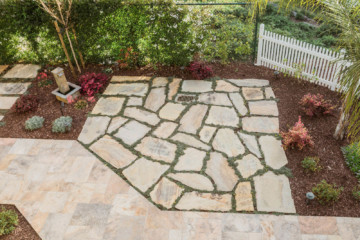
Breaking Down Decomposed Granite
As trends continue to develop and evolve in landscaping, its likely you’ve heard of decomposed granite. Commonly referred to in its abbreviated form, DG, it has become quite popular in modern landscape designs. Not only for its aesthetic allure, but also for its functionality and cost-effectiveness. You may have considered using decomposed granite in your landscape, but what exactly is this hardscape material?
Starting off as solid granite stone, the rock decomposes into finer particles after rain, wind and temperature conditions continue to weather it down. For landscaping use, the gravel pieces are usually three-eighths of an inch or smaller. The gravel is then compacted into a semi-hard, but permeable surface. DG is an excellent option for paths, driveways, patios and even large areas of commercial installations like playgrounds and trails. As an organic material, its natural appearance is appealing to many types of clients and it can also help contribute LEED points for certifications in the construction industry. One of the drawbacks of DG is that it can erode over time or become soft after a rain event, potentially tracking into your home on the soles of shoes. Fortunately, there are many binding options that can help secure your DG in place while protecting against the elements.
Available in a range of hues including red, black, gold and gray, crushed granite also varies in three main types of installation methods. We are fortunate here on the Central Coast to have both grey colored DG that comes from the Aromas Granite Construction Quarry and gold colored DG from the Felton Granite Rock Quarry. Natural, or loose DG can be used as a wood mulch replacement for distributing around trees and garden areas. It can also work great in a bioretention basin where wood mulch wood be washed away by seasonal flooding. Since loose DG does not contain any stabilizers, it is best placed in low traffic areas where it won’t be tracked indoors. Stabilized DG is a mixture of gravel with a light binder which helps the material hold its form more than its natural state. Most patios and pathways are installed with a stabilized granite as it is longer lasting, more resistant to erosion, and its gritty texture provides traction for safe foot travel. Resin-coated DG will produce a hardened surface which works well for driveways as it keeps the granite in place, creating an asphalt-like exterior. Though it may be the most durable of the granites, it is also the least permeable and will not allow for proper drainage.
Over the course of my career I have encountered various questions about the different types of DG stabilization and what is most effective. The best option is to mix in a binder with the product before installing the DG. The longest lasting and highest quality product on the market today is called GraniteCrete. This patented binder combines with water and DG to create a concrete-like surface that is also permeable. It can be used in almost any application and while it is on the more expensive side due to the labor-intensive mixing process, the end result will last for decades. The next step down is a spray-on stabilizer that is applied atop the DG before compaction. Install the granite into your hardscape area, spray on the stabilizer as directed, and then compact for a finished patio, walkway or playing surface. The spray-on stabilizer can lose its grip or be washed away after a few years of rain fall due to the fact it’s not mixed in like the GraniteCrete. But it is a lower cost and less labor consuming process. Lastly, stabilized DG can be accomplished by simply mixing in Portland cement, mortar or another type of concrete material. While this is not advised for commercial application, the average homeowner with a few bags of concrete laying around may be able to stabilize their DG without much added cost. You can create the mixture in a wheelbarrow at a rate of 15:1 DG to concrete, then spread the material down, water it in and compact it. Be mindful that the concrete you use may change the color of the DG, but depending on the application this could be a quick and easy way to stabilize your DG.
Decomposed granite itself may be a simple landscaping element, but the application of anything beyond loose DG is not quite as easy. Professional help is strongly recommended since proper equipment and preparation will set the groundwork for a successful installation. Some of the additional steps of the install may entail edging, grading, and laying down base rock or root barriers. Don’t forget the use of a compactor. To ensure the material will stay in place, the gravel must be compressed firmly into the ground and this is difficult, if not almost impossible, without a granite compactor.
I hope you don’t take this naturally occurring, local granite for granted, but instead are able to find a way to incorporate it into your yard or project site. If you have large redwood trees that are heaving up your concrete walkways, replacing those with decomposed granite can make it much easier to fix and eliminate tripping hazards. Another helpful idea is under your trashcan storage area of your driveway. These spots are usually weed infested and hard to keep clean, but not if swapped out with a low maintenance patch of DG. However little or large your project may be, make your landscaping rock with decomposed granite!

Protect your landscaping against trotting turkeys
During this time of the year, turkeys are everywhere you turn: roasting in the oven, handprint paintings hanging on your fridge, and even turkey trot themed 5Ks. But one place you won’t want to find them is in your yard! Flocks can grow large within city limits since the predator population isn’t as developed as open country. With a range of up to 20 pounds each, a flock of 30 birds can scratch some serious damage into your landscaping. Gobble down these tips to protect your home from fowl play!
First, you’ll need to determine what is attracting the turkeys to your property. Bird feeders can invite several other types of hungry creatures to your home, including turkeys. If this is proving to be a convenient food source for them, remove the feeders until the season has passed. Politely remind neighbors not to feed wildlife, it is illegal in California after all. Turkeys also enjoy seeds, berries, nuts and insects. They will till up the ground with their claws to unearth these tasty snacks and peck clean your bushes and trees. If it’s not gobbling that they’re doing in your garden, they may have discovered a resting roost within your yard. Just like chickens, turkeys like to perch in high places like bushes and branches, some even flocking to the roof or on top of your car.
Establish yourself at the top of the pecking order with these deterrents. If turkeys are throwing mulch or dirt around your property or onto sidewalks, you can lay down mesh fabric or chicken wire over these areas. If they are ravaging certain plants, install tree guards to block them out. Be especially careful to shield newly planted seeds you’ve recently put in the ground by also setting up a fence perimeter to obstruct these pesky poultry. Another alternative is staging 3D “predators” like fake coyotes or scarecrows. Turkeys are not fond of water, so simply spraying with the hose in their direction can send them packing. Flash tape, or streamers, are brightly colored and make crackling sounds when blown by the wind and are known to scare off turkeys. Put up an eviction notice to their roosting spots with this arsenal of defense!
Though it might have been initially exciting to see these gobblers gallivanting out your front window, the allure has probably since faded and their presence become a nuisance. Don’t send yourself on a wild goose chase trying to clean up your landscaping in their wake, make them quit cold turkey with these trot-stopping tips and enjoy your poultry next to a side of mashed potatoes!
Maintaining your hardscapes doesn’t have to be hard
Contemporary landscape design craves more than just green features like plants, trees and lawns. Hardscapes are also integral for function and composition when it comes to creating a unique, outdoor space. Hardscapes are non-living elements like pavers, stone, asphalt, concrete, and bricks. Your landscaping should have a balance of both soft and hardscapes; their harmony will provide a seamless segue from home to yard. Though hardscapes may seem like they demand less attention than living components, low-maintenance does not mean no-maintenance. It’s still important to care for these elements on a regular basis to preserve their value and enhance longevity. Don’t take it for granite, follow this plan for not-so-hard hardscape maintenance.
Clean
One of the first steps in any maintenance routine is cleanup. Blow off excess leaves, dirt or debris and remove weeds that may have sprouted up in cracks. Once you’ve tidied up the hardscape, a deeper cleaning can then be applied. Pressure washing concrete or stone pavers can be an effective way to push out mildew and mold, which can create stains as well as slipping hazards. Its important to check if your hardscape has a sealant prior to pressure washing as this can strip the protectant right off. An alternative option is using liquid soap or natural stone cleaner and a bristle broom, but again, be mindful of too harsh of chemicals that could erode the material or tools that form scratches. Porous matter like concrete and stone are susceptible to mineral buildup, cracking and discoloration, so deep cleaning and spot treatments are necessary for conserving the integrity of your hardscapes.
Repair
Pavers that have cracks or are loose should be mended or replaced, do this quickly to prevent the issue from growing. If your pavers are separating, it may be due to poor base compaction, inadequate soil or loose edges. If raising or sinking is occurring, this could be a sign of a much larger issue like decomposing material, tree roots or water drainage. Another structure to inspect for potential water damage is your retaining wall. Be sure the drains are free of any clogging and check for signs of pooling, especially where soil meets the wall. When concrete begins to crack, (and it will), make sure it is due to natural settling and not outside forces like tree roots or drainage issues. Contacting a professional landscape company at the first sign of these complications can help save you from a much larger headache than if left untreated.
Seal
It seems counterintuitive, but hardscapes are actually quite porous and can absorb liquids and substances that may be spilled on them. Weather exposure can be brutal on certain hardscapes, not to mention staining and sediment build-up. A good way to protect your hardscape from staining or discoloration is to seal it. Sealing your hard elements is similar to sealing a deck or natural wood. Typically, it can be rolled on like paint and multiple coats applied. There are many stain options which can provide a rich color while also defending against deterioration. Choose a natural finish to keep it simple, or opt for a “wet” finish that will give it a nice shine.
Though most hardscapes bode durability, they can still be vulnerable to harsh seasons and environmental breakdowns over time. Concrete evidence shows that these proactive measures will help keep your landscaping in pristine condition over the years to come. Don’t find out the hard way, cement these tips into your annual outdoor checklist and make hardscape maintenance easy!

Light up your landscaping
Though we may have “gained an hour” of sleep, daylight saving time stole 60 minutes of our after-work sunlight. Coming off the wave of summer, we were spoiled with plenty of light during our day to enjoy the outdoors. Now that the sun retreats in the early part of the evening, you may find yourself also retiring inside sooner than usual. Don’t neglect your outdoor oasis just because its dark out, add some illumination to your yard and enjoy your landscaping all year long.
Low voltage lighting is the most common type used for residential projects. It is typically less expensive, easy to install and has the lowest risk of accidental shock compared to 120v systems. The low voltage lighting world has made a lot of advancements over the last three years. The cost of install and run rate have come down, fixture options have increased, and smart controllers give you endless options. Previously, the only customization available was a timer that turned the lights on and off at a set schedule. The Luxor by FX Luminaire is by far the most advanced option on the market today; you can change the color of lights, create zones, add up to 250 lights, create light shows with preprogrammed themes, dimming and so much more! My favorite part is you can control all these features from your iPhone or tablet. I recommend visiting FX Luminaire’s website to learn more.
For those who are looking to get lighting in the yard as soon as possible, you may want to explore solar-powered lighting, which is the quickest and most cost-effective option. You can find these fixtures at all major hardware and big box stores. They have a shorter lifespan and are typically used as a temporary solution until you can install a wired system. For some, these might be just what you are looking for to light up a dark corner of the yard or help make your pathway safer for guests.
Beyond the type of lighting, another consideration for your landscaping luminosity is design and placement. Uplights or spotlights are ideal for flaunting tall elements like trees, buildings and large plants. These work well for bringing attention to individual steps and accenting focal points like outdoor artwork, fancy plants, or even a cascading waterfall. They can also showcase architectural columns, decorative pillars or flagpoles. For pergolas and arbors, you can install a downlight which will cast a downward beam onto the outdoor kitchen, seating or other area under your structure.
As their name suggests, pathlights assist walkways by casting a circular area of light along your path. Be sure to space them out appropriately to provide coverage without over-lighting. Silhouetting is another memorable way to draw focus. With the illumination placed behind the plant or object, shadows and light blend to forge a unique attraction. Floodlights have a broader beam of up to 120 degrees and are more ideal for brightening larger areas of your landscaping. Use floodlights for lawns, parking lots, warehouses and driveways. Since floodlights span more surface area, they are a great choice for security. The more light you have on your property, the less chance of robbery, damage or graffiti. Along with security, adequate lighting can provide a safer outdoor experience.
Think outside the lamp by adding natural light-enhancing features like fire pits, outdoor pizza ovens or heaters. These will contribute a glow while also being functional. Fire features can come in an array of forms including traditional pits, outdoor fireplaces and even gas fire tables. Heaters also come in many creative designs and will double as a light source while giving off warmth for you and your guests on those dark, chilly nights.
Get creative! Set an ambiance with string lights or add recessed lighting underneath your outdoor kitchen cabinets. Hang lanterns on your porch or install color changing underwater lights in your pool and spa. There are lights that are disguised to look like rocks and different tones of light to accent your theme as intricately as possible. Whatever your goals may be, adding light to your landscape will invite a welcoming atmosphere from dusk till dawn.
Fall Tips for a Green Spring Lawn
As the days get shorter and the weather swings chillier, succumbing into hibernation mode is easy. Though we may not be spending as much time outdoors, it’s important to still maintain your landscaping during the off season. We are lucky to live in a climate where we can have a thriving green lawn 365 days a year. Taking proactive care of your property now will bloom its benefits come those warm months. One of the largest elements to maintain in a yard is often the lawn and keeping your grass lush requires more than just watering and mowing. Roll up your sleeves for some dirty work and follow this guide to ensure your turf will still be green come spring.
Soil Testing
Testing the pH and fertility of your lawn’s soil during the fall can help you get ahead for spring. By measuring the alkalinity, acidity, organic content and other key indicators, soil analysis offers helpful insight into the plant’s growth potential and what it may be lacking in terms of nutrients. I highly recommend Perry Labs in Watsonville for soil testing. They will give you a customized recipe for what your lawn needs, ensuring you add only what is required.
Aeration
Just like trees and pants, our lawns need to breathe. Protect the soil in your lawn from surrendering to compaction or thatch, by regular aeration. Thatch is a nutrient and oxygen blocking layer of debris, stems and roots that can accumulate between the soil and vegetation. Restricted access to necessary nourishment will hinder your lawn’s ability to withstand harsh cold elements and winter months. Aerating creates holes in the lawn and punches into the soil, giving the roots access to water, oxygen and required nutrients. Its recommended to aerate before fertilizing in order to maximize the root’s contact with those vital minerals.
Fertilizing
Supplement your lawn with fertilizer around six weeks before the first frost of the season. This will provide the grass time to feed on the nutrients and establish strong roots that will conserve energy and survive a harsh winter. The moisture in fall mornings aids the turf in better absorption, so capitalize on the dawn’s dew by fertilizing in the first part of the day. Don’t forget that soil test, it will give you clear instructions on what fertilizers to use and the application rate.
Seeding
If summer was hard on your lawn, you may have some brown or bare patches that need filling in, or maybe the entire area could use some thickening. Seeding existing turf will help build a more robust lawn. The denser the turf, the better it can protect against weeds. Be sure to give enough time for the seeds to germinate before freezing temperatures roll in, when the soil temperature drops below 50 degrees your seeds will have trouble germinating. Fall is the best time to do this as the days are not too hot, the nights cool and the mornings full of moisture.
Watering
Though there might be more dew and less evaporation this time of the year, that doesn’t mean you should stop watering your lawn altogether. The morning moisture and light rains may not be enough to maintain a healthy grass throughout the whole season. At least 1 inch of water a week is needed to provide sufficient thirst for your lawn. If winter rains are producing that minimum, then you can cease watering on your end. Be cautious of overwatering, as fungal diseases can evolve in an overly moistened environment. If you have an irrigation system, now is the time to adjust its schedule for these requirements. Most controllers have a percentage adjustment, so depending on rainfall and your geographic location, you will want to crank that down to about 50% starting in December.
Mowing
Your lawn will start to slow its growth during these cooler months and the need to mow should be reassessed and reduced. Typically you can reduce mowing to every other week in the winter months. Ideally, the length should be kept at 2 ½ – 3 inches in height. If left too long, you’ll leave an opening for matting, mold and fungi to thrive. If trimmed too short, you may damage the roots and thus the grass’ chance of surviving the dismal, cold winter. Plus, mowing will help to get rid of leaf excess on your lawn; chopping up and spitting out a light mulch to benefit the soil beneath.
Weed control
Several types of weeds may bloom in spring, but their invasion begins much sooner. Halt the real estate that weeds may try to seize by hitting them when they are most vulnerable, in their beginning stages during fall. Multiple applications may be needed to fully stop these pesky plants from enduring to spring. This can be done with a selective herbicide that kills broadleaf weeds, while not hurting your lawn.
Leaf maintenance
A soggy grass will eventually lead to a dead grass, so leaf maintenance is important during autumn. If leaves are left to accumulate and pile up on your lawn, too much moisture will be trapped in and not enough light let though. Routinely rake, blow off or mow through the fallen foliage on your grass to not only protect it, but give your yard a tidier look.
As essential as each of these fall chores are to ensuring a healthy future lawn, their timing in order to be effective is just as critical. Fertilize too early, or with the wrong application and the rigid cold will kill any young, frail blades that have sprouted up. Sow too late and the survival of the seedlings will be drastically reduced. Put off aerating until spring and you’ll be giving weeds permission to make home of your hard-earned lawn. Managing this guide can be quite an undertaking, so hiring a professional to assist in several of these tasks is recommended if you’re feeling overwhelmed. The effort will be worth it when the first sunny and 75-degree day pokes its head out in spring. You’ll be proud to kick off your shoes and relish the carpet of fresh, green grass between your toes.
Don’t let your money run down the drain
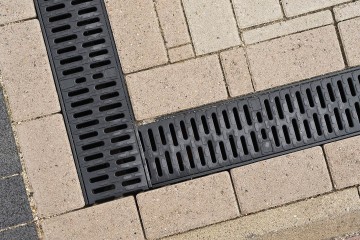
Winter is just around the corner and for us Santa Cruzans, that means rain. Excessive downfalls can wreak havoc on landscapes, causing expensive damage that could take weeks to repair and restore. Just like routine maintenance and irrigation are important for your landscaping, equally imperative is drainage. Don’t let your hard work get washed away with the next round of storms! Invest now in a landscaping drainage system that will protect your property from flooding.
Let’s start with your house or building; the first aspect that often gets overlooked is gutters. The downspouts that carry water down from the gutters can concentrate heavy water flows into the landscape and allow water to pool up against your foundation. We suggest piping the water directly from your down spouts and into a dissipation pit or drainage system. With the amazing views we have in the Santa Cruz area, we no doubt have to battle elevations. If there is a hillside above your home it’s important to intercept the water before it reaches your house, using a swale or French drain.
A swale is a depression within the landscape that redirects water drainage. While a swale doesn’t stop all erosion, it does help direct water to a specific drainage area, defending your landscape or home from flooding. You can make your swale even more effective by adding pebbles, boulders and water-loving plants that will help slow down the water. Make sure to design your swale so it’s not too steep or too flat, either can cause issues with your water flow. We recommend a 10:1 slope for your swale, (1 foot of elevation drop for every 10 feet of distance).
f you have heavy soils, such as clay, you can still have a problem with waterlogging even after the runoff drains away from the yard. You can improve this unwanted soil retention by installing different types of sub-surface drainage systems in your yard, including French drain systems, or surface drains with piping to carry the water to the appropriate area. When a hillside reaches its water holding capacity it can lead to landslides and washouts. Engaging the assistance of a professional landscape planner is strongly advised if you are dealing with steep slopes or challenging applications.
Areas that have been recently graded but not yet planted, or hillsides that have been scorched by our recent fires, are high-risk situations. When you have bare ground, plant low growing native planting or another type of ground cover to reduce the possibility of erosion. If it’s late in the season and rain is around the corner, you can install a product called Jute Netting. This can be put in over bare dirt and is very effective in holding the soil together during rain events. Another immediate solution for exposed hillsides is Hydroseed. This is an application method that installs grass or plant seed, a soil tackifier, and then a fertilizer. It covers and protects the hillside while the seed germinate to provide long term stability.
In addition to drainage, another proactive measure you can take to safeguard your home from excess water is to upgrade your irrigation system. As technology continues to evolve, there are several irrigation options available that include soil monitoring sensors, rain shut-off devices and smart controllers. These features make it easy for homeowners to monitor their landscape and identify problems the very instant they begin to occur. For example, rain shut-off devices can detect rain and temporarily turn off your irrigation system to prevent overwatering. You don’t want to be that neighbor who has their sprinklers running during a rain event!
Once the clouds have parted and the sun is shining, its easy to forget about last year’s rainwater issues. Umbrella your home from future costly repairs like foundation flooding and landscape pooling by installing proper drainage. Put your “rainy day fund” to literal use and design a plan for your home to withstand California’s climate and shield against its heavy rainfall.

How landscape maintenance can enhance your HOA community
If you live in a Homeowner’s Association community, you know the value it can provide for your property. Along with access to amenities, compliance standards, and a stronger community engagement, HOA memberships often include landscape maintenance, which many find as a compelling reason to join. Selecting a qualified and experienced company that understands CC&Rs and has experience working within the constructs of an HOA board will make all the difference in your landscape management experience. The company’s attention to the following points are an indicator you will be maximizing the advantages that can come with living in an HOA community. If you are brave enough to join your HOA board, these points will help guide you when selecting a contractor or reviewing your current provider.
As mentioned in previous Landscaping Lessons, curb appeal can be an important contribution in the overall value of your home, or in this case, collective neighborhood. A community that has uniform design, tidy outdoors and colorful aesthetics is a benefit to all who live there. When it is time to upgrade an area of your HOA’s landscape, it is important to keep with a consistent palette and theme. We recommend working with your landscaper to create a list of plants that are pre-approved to use in designs and future upgrades. Too often we see communities that have suffered from inconsistent designs, which can take away from curb appeal and increase maintenance costs.
Irrigation management is a critical part of the package and a way to help preserve the landscaping and budget of your HOA. With water rates on the rise and no end in sight, it is important to make sure your irrigation system is designed and operating efficiently. A great system poorly managed can have poor results, so it is important that you hire a landscape company that can manage your system and adjust it as needed as the seasons and needs of your landscape changes. If you don’t have a separate irrigation meter from the city, we recommend installing one yourself so you can track and monitor your monthly usage. It’s important to have an irrigation standard for all the properties in your community; stick with one type of sprinkler, one type of controller and one type of valve. This makes maintenance, replacement and upgrades much more efficient. When it comes time to upgrade your system, be sure to explore bids from companies that specialize in irrigation system retrofits, or you could be missing out on the latest and greatest like internet based controllers and wireless weather stations.
Being part of an association means you have a collective purpose, and one common interest for a group like an HOA, is safety. The landscaping on your property plays a large role in the safety of both the homeowners and their guests. Hardscapes like driveways, walkways and decks should all be free of cracks, bumps or tripping hazards. One of the biggest issues I see in Santa Cruz is walkways being lifted up by large Redwood roots, which creates stumbling hazards and leads to injuries and even lawsuits. Leaves should be routinely swept away to prevent slipping accidents and bushes trimmed back for visibility. Tree or branch failure is another issue we often come across, but it is usually preventable. We recommend having a certified arborist review your property annually in October/November for potential tree hazards. Make sure your landscape provider is bringing these safety concerns to your attention on a monthly basis. Over time, these seemingly small tasks can have a drastic effect on your association’s responsibility to keep its residents out of harm’s way.
Desirable neighborhoods have many things in common: prestigious schools, low crime rates, and well-manicured yards. Let landscaping maintenance enhance the charm of your HOA, keeping the community’s value high and your quality of life even higher!