Get a step ahead for spring landscaping
Longer days and warmer temperatures are slowly creeping in as we approach springtime. Welcome this new season by preparing your landscaping for the changes to come so you can enjoy your outdoors as much as possible!
Start your “spring cleaning” outside. Throw on some gloves and clear out any debris that has accumulated in your yard. Rake through lawns and garden beds to remove dead grass, dried leaves, pine needles, twigs, etc. Clearing off this excess thatch will give your lawn the chance to breathe and your plants room to grow. Tidy up your perennials by trimming off any dead stalks or leaves.
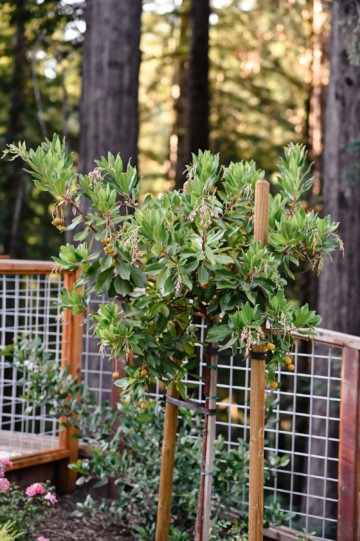
Early March is a great time to prune your shrubs and trees. Proactively cut off dangerous limbs before they fall from your tree and to help give it shape for new growth. Keep your bushes pruned down now to avoid wild overgrowth come April, May and June.
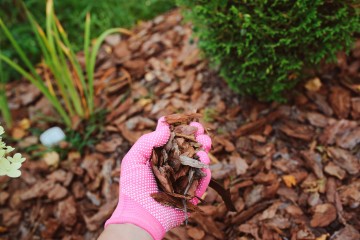
Mulch is one of landscaping’s best friends. It aids in moisture retention and weighs down weeds from being able to sprout up. Replenish your grounds with an application of fresh mulch to give your plants support for the upcoming season. Just be careful not to smoother any potential perennials that may be budding.
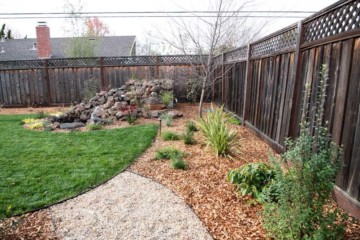
Keep crisp lines between your lawn and other elements or hardscapes in your yard by edging its perimeter. Mow the grass first, then clean up the remaining edges. This will help define the lines in between your landscaping and lawn, leaving a sharp and clean look. Trex decking or other composite wood products can work great as an edge restraint.
Fertilizing your grass should ideally be done soon after or before a light rain, so plan accordingly with these March showers we’ve been having. Supply your lawn now with the nutrients it needs to flourish come spring.
A little preparation can go, (or grow!), a long way. Incorporate these tasks onto your landscaping to-do list before spring bounces in. Leaves will soon be turning green, flowers will blossom, the sun will shine, and you’ll already be basking in a beautifully manicured yard!

Beneficial Nematodes
All of us that love to garden know a downside can be dealing with all those pesky pests! Seeing a favorite plant in distress can have us pulling our hair out, but need not fear, as beneficial nematodes are here to save the day!
These helpful worms are not only killing machines, but they are also a biologic control that does not harm humans, animals or even other worms. These live microscopic organisms seek out and destroy the larval stage of many problem insects including fungus gnats, wireworms, codling moths, corn earworms, cutworms, fleas, fly larvae, grubs, leaf miners, root weevils, and shore flies to name a few! Having problems with moles, raccoons and skunks? Beneficial nematodes will indirectly help with those too. Those animals are digging for grubs, so if you get rid of the grubs, they will be forced to look elsewhere.
Beneficial nematodes are microscopic, unsegmented roundworms that live in the soil. These invisible friends can hunt down, penetrate and kill almost any soil dwelling pest. Many insects that injure our plants have a larval stage in the soil. So, whether the insect damages your plant or the larva eats its roots, beneficial nematodes will take care of the problem. Seeking only the larval stage of insects, they search out susceptible hosts by detecting excretory products, carbon dioxide and temperature changes, kill it with a bacterium, and then reproduce. The nematodes will continue to live and reproduce as long as there are hosts and no insecticides or freezing weather reaches them. Since they will eventually kill all of their hosts, you will need to reapply the nematodes about once a year.
Beneficial nematodes can be applied to your vegetable garden, ornamental beds, containers, lawn, pasture or anywhere that there is soil and plants! I have even applied them to a living wall with great success. They work for indoor plants as well. UV light will kill the nematodes, so apply at dawn or dusk, when sunlight is not direct. It is important to have moist soil, so give a light watering to the area before and after the nematode application.
Having used beneficial nematodes for an extended time, I can definitely attest to their effectiveness of honing in and killing soil born larvae in many situations and landscapes. Most of them come refrigerated and must be kept chilled and used within a month. There are different types of nematodes, so do some research and make sure you purchase the correct nematodes for your problem. You will also find charts to help decide how many you will need for the area you wish to treat.
Even the tiniest of critters can have an impact on your landscaping, but with beneficial nematodes you can fight nature with nature and keep your plants living their greenest life!
Plan Now for Fire-Safe Landscaping
Fire safety has grown exponentially important for California residents over the last several years. Here in Santa Cruz county, we have experienced firsthand the impact that wildfires can have within the community. Fire safety is a year-round effort and during these winter months there are several measures you can take to proactively combat against future potential fire hazards in your landscape. This is a friendly reminder to evaluate your property.
Planning ahead is one of the most crucial steps in fighting against fire safety for your home and its never too early to prepare. Now is when weeds are developing and growing so by the time the dry season comes about, they will make for ideal kindling. Grass meadows and naturalized areas that are adjacent to homes and buildings should be mowed on a regular basis during the growing seasons. It’s important to pay attention to these types of areas and make plans now to keep them mowed this fire season. Santa Cruz has been getting some extreme weather this winter, with a mix of rain, wind and sun we should all prepare for another difficult fire season.
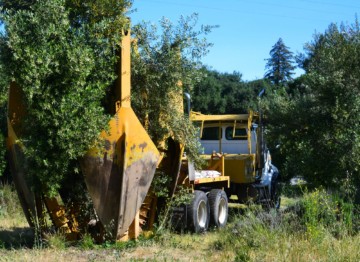
If you are looking to hire a contractor to help with your fire prevention maintenance, now is the time to start looking for your team. Many of the tree service companies and mowing contractors have large backlogs right now, if you wait until you need them it may be too late. Your local fire marshal can help provide information on how to prepare your home and property for fire season. Much of the work can be done now and should not be put off until the fire season begins.
It’s easy to neglect landscaping maintenance when the weather is cold and wet, but don’t let that prevent you from staying on top of defensible space within your property. Clear out dead brush and drying piles today before the warm weather creeps up on us. See if you can create a 30’ buffer of very little plants or trees around your dwelling to achieve that defensible space. For more specifics on how to create defensible space in your property, visit Cal Fire’s website or check out our previous blog on Fire-Safe Landscaping.
It is our responsibility as residents to keep our homes and community safe from potential fire hazards and you can never be too prepared. Stay diligent with your property and plan ahead with these steps!

What is Xeriscaping?
Not to be confused with zero-scaping, xeriscaping is a type of landscaping that reduces its need for irrigation beyond the water its natural climate can supply. A Greek derivative, xeros means “dry”, so its simple translation equals to “dry landscape”. It’s also known as water-conserving landscaping or drought-tolerant landscaping. But dry doesn’t have to mean boring and bland, a xeriscape can still be colorful and appealing when planned out thoughtfully!
Designing a xeriscape needs to consider several key components: minimal but effective irrigation, water efficient plants, native plants and supporting elements like artificial turf, mulch, rocks, gravel, stone, brick, wood, etc. Besides choosing specific flowers and plants that are drought-tolerant or require less watering, their placement within your landscaping is also important. Grouping and organizing plants near each other that require the same amount of water will make for easier irrigation mapping and less waste.
Unlike traditional style sprinklers that may only reach the surface of the plant and evaporate before penetrating its base, drip systems can be positioned directly where the plant needs water the most. Additionally, plants that need small amounts of hydration can sit at higher levels, while those that thirst for more should be planted in lower elevations where they can soak up excess water. Utilize mulch to give areas a clean look while also helping to retain moisture for its surrounding plants. Replace real lawn with artificial turf, or add hardscapes like stone, rocks, wood or gravel to round out the design and mix up the aesthetic.
Artificial turf can often get a bad rap for not only appearing fake, but for taking up space in our landfills when removed. Only you can decide which is right for your landscaping, but I will give you something to think about based on a 15-year lifecycle and a lawn size of 1,000 square feet. A living lawn will utilize 273,750 gallons of water over 15-years. You need to mow your lawn every week which requires a lawn mower and gas, this also creates emissions into the air and sooner or later that lawn mower will break down and end up in the landfill. You need to dispose of your lawn clippings, this is usually free but still takes up space and creates greenhouse gasses as it decomposes. When you start to compare the differences, artificial turf can look like a very “green” option.
Xeriscaping has grown in popularity over the last several years, especially in states like California that are prone to seasons of drought. Its benefits are bountiful, but its obvious advantage is water preservation. It has been estimated that switching to a xeriscape can lower your water usage by over 50%. Saving on water will also save you money and time. Santa Cruz water rates are projected to increase over time, so getting ahead of the next drought is a great idea. Xeriscaping requires much less maintenance and native plants are less likely to need pesticides or added fertilization. After all, plants that are placed in their native environment should need less human assistance than plants from another climate.
So which plants are best for xeriscaping? Well, that depends on your particular climate, and more specifically within the sub-climates of Santa Cruz county. A good rule of thumb is to look for those that require lower amounts of water and are known to be drought tolerant. A few choices that tend to work well for us here in Santa Cruz include lavender, juniper, agave, ornamental grasses such as juncus, seaside daisy (erigeron), yarrow, cactus and the ever-popular succulent. Even several herbs like sage, thyme and oregano can be great additions to your xeriscaping garden.
Xeriscaping isn’t just for desert regions; it can be a financial and economical solution for anyone looking to upgrade their landscaping and wanting to save on time, money and water!

Top 10 Landscaping Tools Every Home Needs
Gardening and landscaping go hand and hand but having the right tool in your hand can make all the difference. Whether you’re prepping a summer herb garden bed, pruning back perennials or removing dead shrubs, safety and efficiency will be ensured by using the right equipment for the job. Get to the bottom of it and dig out these landscaping tools to make sure your collection is complete.
Shovel
Available in a range of shapes and sizes, the shovel is an essential piece within a landscaper’s repertoire. From digging holes to planting bigger bushes and plants, the shovel will be your go-to tool in the shed. Make sure to choose one with a handle that is appropriate to your height to avoid back strain.
Trowel
A trowel is used for smaller planting and digging and ideal for potted flowers or vegetables. Acting as a mini-shovel, its another must-have for your garden toolbox.
Pruners
Similar in appearance to scissors, pruners will help trim away at small branches and twigs or clean up dead flower heads.
Loppers
If your pruners just aren’t cutting it, it may be because it’s a job for the loppers! With longer handles for better leverage and larger blades, loppers are designed to cut branches that are too thick for the pruners.
Shears
Trim back bushes cleaner than Edward Scissorhands with a sharp set of shears. Besides pruning shrubs and hedges, these extra-large scissors are useful for sculpting and cutting multiple branches with a single snip.
Digging Fork
Loosen and sift through soil with this helpful garden utensil. Compared to the shovel, the digging fork can break apart stubborn dirt clumps and is great for turning compost. If your garden tools budget allows, springing for a rototiller can help save your back here.
Garden Rake
With spring quickly approaching, the garden rake will soon be making a regular appearance. This tool assists with cultivating soil, seeding prep, can level out mulch or even be used to till up thatch from your grass, just to name a few.
Leaf Rake
Leaves aren’t the only thing rakes can clean up from your yard. A leaf rake is also useful for getting any other debris or dead foliage out from your landscape beds and lawns.
Garden Hose
Don’t get hosed by opting for a cheap product, invest in a quality-rubber watering coil and it will last for years to come. Pair it with a heavy duty, multi-setting spray nozzle and hosing your garden will be a breeze. Be sure to store the hose away from extreme weather conditions… or teething puppies!
Wheelbarrow
A wheelbarrow can serve a multitude of functions for your backyard tasks. From hauling around all the above tools, to lugging dirt piles, moving firewood, and transporting large plants, the wheelbarrow makes heavy loads seem light.
It doesn’t take the sharpest tool in the shed to know a charming outdoor space requires routine maintenance and upkeep. Build your landscaping depot with the above arsenal and you’ll be able to handle just about any home project with ease.
Gophers Be Gone
Punxsutawney Phil’s verdict from this Groundhog Day was six more weeks of winter, but that doesn’t mean you have to give his cousin, the gopher, six more weeks in your yard. Though gophers may look like cute and innocent critters, they can create mounds of destruction in your landscaping. Not only are the holes and heaps unsightly, but they also form tripping hazards. Follow these proactive solutions to help prevent these pesky rodents from invading and destroying your property before they have the chance.
It’s important to note the difference between gophers and moles. Gophers are rummaging for roots and plants within your landscaping, while moles are searching for grubs or earthworms within the soil. Gophers forge pits and piles as well as underground channels, while moles burrow shallower tunnels that pillow on top of the land. Getting rid of them though requires the same action… remove their food source.
There are several tactics you can use in your arsenal against gopher invasion, but the first would be to eliminate the main reason for digging, their food supply. These ground creatures will weasel their way into your dirt to munch on moisture-rich roots and vegetables. Extract their favorite snacks and replace them with plants that are naturally repellent to gophers like rosemary, strawberries, and lavender. When it comes to moles the best way to rid them from your yard is to remove the grubs and bugs they like to eat, this can be accomplished with a systemic insecticide such as Aloft.
Once you’ve closed their favorite outdoor restaurant, you can start defending the soil with fences and barriers. Installing galvanized mesh or chicken wire around the perimeter of your lawn or garden. This will need to be placed several feet into the ground as well as above it. Then implant gopher wire under your lawn and around your plants. This can be a big undertaking if you have a large lawn, but it will be worth years of gopher threat protection! Gopher baskets can be bought at your local hardware store and will create a barrier around your plants and trees. The best time to install gopher baskets is when you first install your plants and trees, adding it to existing plants can be done but it is typically less effective and can damage the root systems.
If these rodent miners have already invaded your landscaping, making their home unpleasant will help push them out. Fill their holes with deterrents like peppermint oil, garlic stakes, chili powder or pine disinfectants. Gophers can be sensitive to sound, so loud noises like a radio or windchimes can send them packing. Additionally, ultrasonic vibrations can be enough to annoy and cause them to flee. Ultrasonic devices are available in battery or solar powered and can be placed directly on top of their underground lair. Start with a tunnel opening in the corner of your property and then over the next few days work your way across to the other side.
Many pest control companies use poison or bait stations to solve gopher invasions, but I would advise against this due to the possible secondary kills to our local wildlife and house pets. The proactive approach using gopher wire and baskets is always best, however, if you find yourself in a dire situation, calling in the professionals may be your only option. Opt for trapping over baiting to lessen the environmental impact.
A gopher problem is known to be a persistent one, so once you’ve cleared out the last of them, make sure they don’t come back by following all of these steps! Level out their knolls, fill their holes and take back your landscaping!
Post-Storm Landscaping Checklist
Atmospheric river, El Nino, and low-pressure systems are just a few trigger words we hear on the news that remind us about that drainage issue, leaky roof or hazardous tree we haven’t taken care of yet. As the heaviest rain event of the winter just passed here in Santa Cruz, it’s the ideal time to examine the impact on your yard. Depending on the size of your property, the below checklist takes only a few minutes and can potentially save you thousands in the long run.
Trees
These large friends may pose the greatest risk to your home and safety. Failing limbs, uprooting trees and cracking trunks can all cause severe destruction. After a storm it is important to inspect every tree on your property. Start by making sure there are no hanging limbs that may break and fall while you are performing your inspection. Next, investigate the trunk and root system for any cracks in the tree or the soil. Cracking or heaving soil around a tree can signal a potential for failure and should be reviewed by a certified arborist. Lastly, do a scan of the canopy to ensure there are no cracked or hanging branches, (binoculars come in handy for tall and large trees). Many tree and limb failures have warning signs and directly after a storm will be an optimal time to gauge probable issues.
Drainage
We tend to forget about our underground water management systems until they don’t work properly. After a downpour you’ll be able to see what worked and what didn’t work in your drainage system. The first step is to check for any clogged or blocked drains. If you do find a blockage, work to free the flow quickly. Next, confirm that your downspouts are steered in the right direction, poor design can cause additional issues. If drainage problems go unchecked, it can lead to failed retaining walls, damaged siding on homes, erosion and much more. You may also find that there is standing water under your house, a French Drain may be just what you need to move the subsurface water away from your structure. Check out previous Landscaping Lessons on drainage for more ideas and solutions.
Plants and landscaping
Occasionally planting areas can become flooded, which may pose harm to sensitive plants and flowers. Proper swales and grading are vital to get water moving out of your planted areas, as sitting water can kill your beautiful plants. You can use a dry creek bed as an easy and effective way to divert water into an area where it won’t impair delicate greenery. A dry creek bed is a low lying area or swale that is covered with cobble stone and sparsely added with water loving plants such as Juncus or Carex grasses. This provides a stable location for water to slow down and absorb into the soil. It should always be your intention to retain all stormwater on your property and give it a chance to soak into the soil, recharging our aquifers and eliminating oils and debris from flowing into storm drains.
Hillside and erosion
Similar to trees and tree limbs, your hillsides will “talk” to you about their stability if you’re willing to listen. There are often signals as your hillside begins to become saturated and unstable. Some of these signs may include small amounts of soil movement, cracking in the soil structure, water seeping out of the base of the hillside and water run-off becoming concentrated in one area. Survey your hillsides for these and other signs of possible erosion, looking closely at areas where vegetation is sparse, such as surfaces recently burned or relandscaped. If a hillside has been newly graded, it should be considered high-risk and protected with a ground cover. This could include landscape fabric, mulch, planting, or plastic, but never leave freshly graded areas exposed to the elements.
Fencing
This last storm brought with it strong winds, which we all know can disrupt and damage fencing. Fence boards can act as a sail in the wind creating tremendous stress on your fence posts. Walk the perimeters looking for any battered or loose sections and strongly shake the fence to check for its stability. Don’t forget gates and entry ways as well. Identifying these issues now can help save time and money in the future.
The honey-do list always seems to increase after a large rain event, so take care of these key items before the next storm rolls in. As many of us found out this week, unexpected weather will come to steal our sleep, sanity and in the worst-case situations, leave damage to our properties.

Growing in New Directions: Living Walls & Vertical Gardens
A traditional landscape will span over a memorable horizon. Luscious green lawns, blooming flowers, cohesive color schemes, artistic walkways and unique lighting are just a few elements that can contribute to an impressive design. But landscaping trends are always evolving with creativity and over the past few years we’ve seen some modern concepts climbing in popularity: vertical gardens and living walls.
A vertical garden is an excellent option for smaller spaces lacking in square footage but still craving greenery. Intimate backyards, apartment decks and modest patios offer limited ground space, but instead can host vertical outdoor decoration. The term ‘vertical garden’ is used loosely, as it can be structured in a number of different ways and designs. You can fill in a wooden frame, hang a trellis, stack pots or trays on top of each other, or even use a repurposed pallet. The possibilities are only limited to your imagination! Vegetables, tomatoes, Rosemary, fruits, your favorite herbs or even some annual flowering plants are all great choices for these eye level gardens, and they give wallflowers a whole new meaning! Imagine having a garden on the wall of your kitchen, depending on the amount of light you receive this may be possible and you can simply pick your herbs right off the wall for your cooking delight. Another upside to verticalscapes? Their ability to be moved if needed or desired, as most are not fixated against or mounted on a wall permanently.
Similar to a vertical garden, living walls make great conversation starters. The difference between vertical gardens and living walls depends on who you ask, my classification is that gardens will be mostly used for herbs, fruits and vegetables (edible) and a living wall’s primary use is for aesthetics. The living wall’s upward instead of outward approach literally flips landscaping on its axis. You can cover an entire wall or fence for a dramatic aesthetic while simultaneously aiding in privacy and protection of your outdoor space. We have utilized this design element in small patios where planting areas are limited, along large concrete sound walls where the harshness can be tamed by greenery and even inside conference rooms to give your office a greener vibe.
A living wall, requires some key elements for success and depending on the type of wall (fence, building, concrete, etc.) you are attaching it to, the prep work will be slightly different. One thing you will want to be sure and include is a waterproof barrier between your plants and your wall, the other is an automatic irrigation system. Because living walls are irrigated from the top down it’s easy for the plants at the bottom to get overwatered and those and the top to get underwater, for this reason it’s crucial to set up the irrigation delivery system properly. How you attach the plants to the wall matters and I have seen some major failures over the years. Our favorite product is called GrowUp Living Greenwalls and they offer a simple, yet effective solution to your living wall needs and even have a watering system built in.
You can include a large variety of plants in your living wall however depending on the sunlight, the soil you use and microclimate you are in, it may take a few tries to get the right mix. Some of our favorite plants to include are: Ivies, ferns, moss, succulents, fuchsias, wisterias, and certain grasses and other flowing plants. My advice is try different types to get the appearance you want and go into it expecting some of the plants not to make it, as not everything can live on its side.
If you’ve recently downsized your house or moved into an apartment vertical gardens and living walls are a great option to bring some green into your life. Don’t be bound to the ground when designing your next home project. Take your “landscaping” to new heights and enjoy a vertical garden or living wall!

Critical Landscape Components: French Drains
In our Santa Cruz climate, proper drainage is especially important if you want to keep your landscaping and home protected from water damage. An overabundance of water can drown certain plants, harbor disease, ruin the soil beneath turf, compromise the structure of retaining walls and have negative impacts on wood siding. It can even affect the foundation of your home. One of the most efficient ways to prevent these damages is by installing a French drain system into your property.
So what is a French drain exactly? Also known by multiple other names including curtain drain, land drain, French ditch, sub-surface drain, rock drain or drain tile, the French drain is a critical component in landscape design for areas that are prone to water accumulation. It is essentially a trench filled with rock or gravel, filter cloth, and perforated pipe that collects excessive water underground and diverts it away from the area you are protecting.
French drains are typically used along building foundations and behind retaining walls where subsurface water can accumulate. The main cause of retaining wall failures is the weight of the standing water behind the wall, which adds too much pressure on the wall and basically pushes it over. Along with causing pre-mature wood rot, water is a huge problem for wooden retaining walls.
The French drain trench is typically only 6-12 inches wide. It’s important to identify the proper elevation to install the system and have enough slope in the pipe to keep the water moving in the desired direction for your specific project. The depth of the drain is determined by the structure you are trying to protect.
When correctly installed, the perforated piping in the French drain collects the water and empties it to a lower portion of the property where it will not cause damage to structures. In some cases where there is not enough slope to the appropriate drainage location, a sump basin and pump can be installed to move the water to a suitable location.
Once the ideal location and depth of the French drain have been determined, it is time to start digging. After the trench is excavated to the proper depth with enough slope, the installation of filter fabric, drain rock, and perforated pipe is carried out. A common mistake is to install the perforated pipe with the holes facing up, but this is actually incorrect. The holes should face down to allow the water to percolate up into the pipe and be carried away to the correct location. Another piece of advice: never connect other drains into the French drain, including downspouts from the roof or surface drains that may contain debris. This can clog up the perforated pipe and cause the French drain to fail.
With so many variables involved in determining if a French drain is the right solution for you, it’s important to contact a landscape professional that has proven experience in assessing drainage issues and knowledge of various drainage systems to evaluate your property and its specific challenges. Don’t let water concerns bog down your landscaping, protect against them with a French drain!

Weed Control
After a long, warm summer, many of us are eager to embrace the first rain that winter drops upon us. With it comes a sense of refreshment, rejuvenation and renewal, but it can also bring an opportunity for a dreaded yard pest to appear… weeds! If you’re concerned with weeds sprouting up in your landscape this spring, now is the time to take charge before the heavy rain season begins.
Be aware of the different areas where weeds can invade your property. Shrub and tree garden beds are where weeds are most unsightly and will cause you the most headache. Secondly, weeds can choke out healthy lawn blades and then create brown spots when the perennial weeds die off. Additionally, are the ever-present hardscape weeds that seem to grow in every crack and cranny you didn’t know was there. Lastly, weeds will grow in natural undeveloped areas such as hillsides and open fields. Think about each area in your landscape and how the weed control methods described may be applied to the zones differently.
Preventative and Cultural Weed Control
These methods refer to efforts taken to prevent weeds from ever becoming present in your landscaped areas to begin with. Examples can include only using certified weed free seed when applying lawn seed, cleaning tools and equipment prior to mobilizing on your project, and clearing nearby fields before the wild weeds go to seed. Some additional examples of cultural weed control are maintaining healthy plants and ground cover, densely placing plants to create competition, ensuring your soil fertility is optimal, keeping your lawn full and healthy, and applying mulch to bare dirt areas so windblown seeds can’t germinate. These methods will help reduce the need for chemicals and give you a fighting chance against the uninvited visitors.
Mechanical Weed Control
Mechanical Weed Control is any method that utilizes equipment or human power to remove weeds. This can include hand pulling, mowing, hoeing, tilling and other hand tools that physically extract the weeds. This procedure is typically used after weeds have been germinated, but you can also till the ground right as you see weeds emerge to disrupt their germination cycle. Although I will warn you, the tilling practice is usually a revolving door of tilling, weed growth, tilling and weed growth. There is nothing wrong with getting outside with your favorite pair of gloves and doing some good ol’ fashion weed pulling. This method, in combination with preventative and cultural weed control, can help eradicate the majority of your weed issues.
Chemical Weed Control
Chemical Weed Control includes the use of any chemical agent to aid in weed suppression. There are many categories of chemical weed control, but here are the top two:
Pre-Emergent can be used to reduce the number of weeds that show up in your landscaped areas. Preemergent is a proactive approach to weed suppression, it forms a layer or barrier on the soil which helps to prevent weeds from germinating, killing the seeds before they have a chance to develop into full form weeds. Preemergent can be applied in a liquid or granular form and most require water to activate. Be sure to apply this prior to a rain event or you will have to use irrigation or a hose to water it in. Once applied, it can last several weeks or up to several months depending on the type and application method. Applying this product in January can help reduce the spring explosion of weeds and therefore reduce the amount of chemical spraying needed.
Post-Emergent herbicides are typically used as a last resort for weed control. As pre-emergent weed control is used to hinder weeds before they grow, post-emergent is used to control weeds after they have already sprouted up. There are many different types and uses of post-emergent weed control, starting with systemic vs. contact. Systemic will be absorbed through the plant to kill it from the root up, this can take longer but usually will prevent that plant from coming back. Contact herbicide is great for annual weeds as they kill on contact ensuring the stem and leaves of the weed is destroyed immediately. There are also selective and non-selective herbicides. Selective herbicides are designed to only kill broadleaf weeds without damaging nearby grass. Non-selective are the most potent herbicides which kill anything it touches including lawns, plants and even trees. Be very careful when applying any post-emergent herbicides and always read the label before using the product.
Most of us would prefer not to use herbicides or chemicals to kill off these pesky plants, so planning ahead and preventing weeds will be your best bet to reduce the need for such agents. Even though most of us think of winter as a time to hunker down and wait for spring, I encourage you to use the breaks of sunshine in between rains as an opportunity to get your beds and gardens weed-free. Put some of these methods to work and prevent weeds from overtaking your masterpiece this year!