
Preparing Your Garden for Spring: Time to Fertilize, Trim and Mulch
Getting the right plant selection for your garden in time for spring is not the only thing that will make it bloom. It is the concerted effort in preparing the various aspects of planting that deliver a successful grow.
As a gardener, you want to explore the endless possibilities that spring brings with the right kind of plant mix and on-the-ground preparation. While it may not be glamorous, it is the seemingly innocuous preparatory steps that will get your planting to stand out when in full bloom.
Here are a few things to look at when going through preparation for springtime.
Prepare your Soil
As you prepare to enter into the coming season, you need to get your soil ready for it as well. Turn the soil over using a rake to clear out any existing weeds. You can go the non-chemical route or pull them out with your bare hands or decide to use chemicals over a large area.
Whichever approach you decide to take, the endpoint needs to be the same; clearing all weeds. If you choose to use chemicals, pay special attention to the instructions to avoid negatively impacting your soil in any way as your yield will go down.
Once you deal with the weeds, you will want to bolster your soil’s nutrient load by enriching it with compost. Before you add any nutrients however it is advisable to first conduct a soil test to learn the current state of your soil (its nutrient and pH levels). The test results will guide you on what to add to the soil and how much of it to add.
If you have a compost pit, you can add fresh compost from it, or you can just get some from the store. Dig deep enough to turn the soil over completely and aerate it. 12 to 14 inches deep is adequate to effectively loosen it. You will ensure that top soil gets the fresh compost as well.
Prepare the Tools
When getting ready for the season you need to get the tools ready for the job at hand. Take inventory of what you have, and in light of the planting plan, you have to assess whether you need to expand or switch your tools to fit the coming tasks.
Clean them with water and a cleaning agent to get the dirt off. For any tools with wooden handles, you can use mineral spirits of those sections to avoid wood splintering.
While looking at the tools, you can also assess your current supply inventory to know what needs replenishing. From your fertilizer to plant supports or even crates you’ll need, you have to ensure that these supplies are ready for spring.
Deal with Pests Ahead of Spring Time
Another item to cross off the list is removing any pests that might make your season disastrous. Look for slugs, aphid colonies or even snails in the crowns of any perennial plants in your garden.
Collect Rain Water
One of the tenets of landscaping is a collection of rainwater. Tap water is alkaline and is not the best for watering some plants like the ericaceous ones for example. Rainwater has the perfect aquatic profile for such plants, and it is also good environmental practice to harvest rainwater. It is therefore important to adopt a landscape design that allows for rainwater harvesting.
Get to Pruning
Part of your garden planning for the new season is trimming plants that have grown too big and are now adversely affecting your other plants. If you have old wood growing, then this is the perfect time to go snipping because they now display their branch structure clearly. The buds still haven’t gotten out of dormancy, and you can shape them as you desire.
Use isopropyl alcohol and a clean cloth to clean your pruning tools before each cut to avoid spreading any potential plant disease. A tad bit to always remember is that once you prune you should add some fertilizer to bolster the soil’s capacity to help the plant heal its wounds effectively.
Clean the Greenhouse
The use of greenhouses in gardening has been on the rise in recent years. As the new season approaches, you need to clean your greenhouse thoroughly especially due to resilient pests. Clear the floor and benches of any debris.
It is good practice to use a disinfectant on the inner glass areas to combat any pests that are hiding out there. They can be quite tiny to see while living in the most microscopic cracks waiting to wreak havoc when you plant again. Let your greenhouse air out for some days before beginning the next plant.
Construct Garden Beds
The start of every planting season can be exciting and feel like it’s full of possibilities. While you can dream of all you would want to grow, you need to work with the capacity you have. Look to build more plant beds to create room for the greater inventory you desire. Contain your enthusiasm for the new season within the context of what you can and can’t grow.
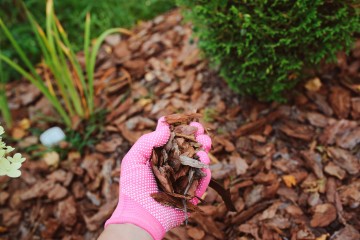
Mulch It
When mulch is applied well (i.e., thickly), it acts like a blanket that insulates the plants from weeds especially if you can lay it before the weeds begin to grow. Organic mulch will help you to maintain the soil moisture. The best level of application is at 75mm. Though it’s thick enough to resist weeds, it can let water through. Otherwise, the plant will become starved and die off.
Plant Early
A splendid way to get ready for spring is to plant them indoors so that by the time the season arrives you will be transplanting them outdoors.
Conclusion
A successful planting is more than just the exciting bits. The soil is the foundation, and it needs to be enriched to bear up the rest of the duties in season preparation. Develop an overall plan on how to transform the garden and prepare bit by bit with that framework to make the best decisions.

Winter Damage: How to Protect Your Garden
Winters along the Central Coast of California are mild, especially compared to the North East and Canada. Still, gardens can suffer from damage during the winter months, and that is a sad day. This blog post helps you preserve all of your hard work, not to mention the beauty and harmony that a garden can bring. So read on to learn about the damage that winter can cause, and some landscaping ideas to keep your garden thriving through those more mild months.
What is Winter Damage?
During the winter months, gardens often times experience drastic weather changes and conditions that are difficult for specific plants to adapt to. As a result, damage can occur. Sometimes it is mild damage and the plant can recover. Other times, the plant is not strong enough for regrowth. Only time will tell, as oftentimes you will have to wait until winter is over in order to see who survived the season.
Winter damage can be due to increased moisture, among other factors. Since here along the Central Coast of California, we do not see any snow, frost is less of a risk factor. Nonetheless, the plants that grow in the Central Coast hardiness zone must go through the same climatic adjustments as plants who live in other zones.
Hardiness zones are the categorized regions that determine what plants can thrive based on the climate. Because the coast does not get much, if any snow, there is less insulation for the roots. When the ground does eventually get cold, the roots are more susceptible to the colder temperatures and thus, ensuing damage. Luckily, there are ways to prepare for this. Read on for tips!
What to Do to Protect Against Damage
The best way to protect against winter damage is to plant plants that do well year-round. But sometimes this does not always work out. Fortunately, there are ways to protect against the damage that those winter months can cause.
One such way is to add additional layers of soil and compost. This ensures that your plants have enough nutrients to last through the winter time. It also acts as a blanket for the roots. The added nutrients mean that the plant does not need to store as much energy in its stem, which can be dangerous to the plant’s survival.
This is especially the case if there are times during the winter that temperatures get close to freezing. The stem is not always prepared or capable of protecting energy stores from more extreme temperatures. In this case, the plant may survive through the winter, but when it comes time for regrowth in the spring, the plant does not have the necessary nutrients or energy.
Another way to help plants through the winter is in your landscape. If there are places that get more sun during the winter months, be sure to plant your garden here. The sun will warm the soil.
Keep in mind, the sun does not shine in the same places of your yard during the summer as it does during the winter. This is due to the rotation of the earth. Therefore, your landscaping can be very creative and effective in helping your garden thrive year-round. Check us out for more landscaping ideas that are sure to put you to work on landscaping ideas garden.
What Grows Well During the Winter Months?
Maybe you like to garden year-round. There are plants that are suitable for growing during the winter months. You can even coordinate your garden to where you rotate your plants by season. It is a lot of work, but if landscape and gardening is your thing, you may really enjoy this.
In order to successfully grow through the winter, you want to make sure that you plant the seeds in warm weather. Doing this gives them enough time to germinate before colder temperatures set in. After germinating, they will have more strength and therefore, a greater chance of surviving through the winter months without incurring much damage. Then hopefully they will continue to grow in the spring.
Finally, chances are that there are parts of your yard that have no plants because they do not grow at all during the winter months. It is a good idea to plant a cover crop. While this will keep your yard looking nice, it will also keep the soil rich in nutrients for the next season. Most plants need to be rotated anyway so that the soil does not get depleted of essential nutrients.
How to Help your Garden Through to the Spring Months
After the cold comes the rain and slowly warming temperatures. During this time, it can be easy for plants to get waterlogged. As such, you should try your best to incorporate water drainage systems into your landscape design. Ideas could include trenches or tiny rivers. You could decorate with rocks and make little fairy towns or turn into small ponds or bird baths. The ideas are endless, but the point is to give your plants space and resources they need in order to drain the excess water.
You will also want to slowly reintroduce fertilizer and compost. Remember that after winter, your plants may not be used to using a lot of energy. Therefore, overwhelming the plant with nutrients would be similar to eating a Thanksgiving meal right after a three-day fast.
Conclusion
All in all, your landscape design ideas can make or break the chances of your garden surviving through the damage that could occur during the milder months. It is easy to get creative while also being productive. While the best place to start is by protecting your current plants with added soil over the roots, you may also want to start planning drainage systems and plant winter crops. These strategies help prepare the soil for the spring and also make your garden look healthy and vibrant.

5 Items That Will Turn Your Yard into a Simply-Styled Yet Beautiful Christmas Landscape
Decorating your home for Christmas is always great fun, but there is a danger in doing too much in your Christmas Landscape. You don’t want your home to become an exaggerated example of a holiday home.
Going overboard is easy if you’re not being careful. In order to avoid that, it’s best to stick to a simpler approach to decorating.
That said, simple does not mean the same as dull. Indeed, it is possible for you to create a beautiful yet understated Christmas landscape in your very own yard. And you can do that by just sticking to adding the essential pieces of holiday décor.
Even without spending a fortune on decorations, you can transform your yard into a setting fit to host the holidays.
-
Yew Bushes Are Perfect for the Holidays
Let’s start with some plants that belong in your yard during the holiday season. Yew bushes, in particular, fit so well into the holiday aesthetic.
Even if you’ve never heard of a yew plant before, you’ve likely seen one. They can be grown up to various heights depending on what you need for your yard. That makes them ideal seasonal plants.
For Christmas time, what you want to have in your yard are yew bushes. Encourage them to grow in tight, circular bundles, and they’ll almost look like Christmas ornaments lining your yard.
Another plus to allowing yew bushes to grow in your yard for the holidays is that they are quite resilient. The chill in the air will do little to hamper their growth.
These plants also retain their striking, dark green hue very well. That means they can stay as elements of your landscape design all year. By the time next Christmas rolls around, they’ll be ready to add a gorgeous green element to your yard again.
-
Bucket Planters Are Useful Holiday Decorations
Getting more greenery into your yard for the holidays is a good idea, but yew bushes aren’t enough. Diversity makes any holiday decoration setup more interesting, so introduce more plants by utilizing some special tools.
For Christmas time, the tools you’ll want to use are bucket planters.
Bucket planters will help you get more plants into your yard even during the winter months. Plants that aren’t as capable of standing up to the winter climate can be protected better by the bucket planters.
HGTV points out that you can also dress up the bucket planters to make them more visually appealing. You can decorate the buckets themselves or add some embellishments to the plants to give them some more character.
Line these bucket planters up with your yew bushes and you’re sure to have a festive-looking yard.
-
Light Up Your Christmas Landscape with Luminaria Bags
No outdoor Christmas decoration setup would be complete without some lights. Everyone’s familiar with those Christmas lights that are hung from rooftops and doorways, but those aren’t the only options available.
To shake things up for this holiday season, why not change the way you do the lighting. Instead of having the lights emerge from on high, have them spring up from below to create a different effect.
In order to achieve that desired effect, what you’ll need are luminaria bags.
You can place them just about anywhere in your yard and they’ll look great. If you want to get the most out of them though, Good Housekeeping suggests using them to line a walkway.
Let those luminaria bags guide guests to your home by showering them with warm splashes of light.
You can get luminaria bags in different designs as well. Get the ones that catch your eye and they will help you turn your walkway into an invitation to a celebration.
-
Transform Your Porch with Some Simple Additions
After filling the yard with gorgeous greenery and landscape lighting, the porch should be next on your list.
You should do a little more to dress up your porch. That’s because it’s a good idea to have a focal point for your holiday landscape design. It doesn’t take much to get your porch ready for the Christmas season.
Better Homes & Gardens lists a few items that you will need for properly decorating your porch.
The first thing you’ll need is a table. Make sure it’s small enough to fit snugly into your porch but also offer enough space to hold some additional items.
Cover the table with some cloth. In keeping with the holiday theme, stick with green, red, and white as the primary colors for the cloth.
Now, you can really have some fun as you can also place some candles and/or pinecones on the table. If you happen to have one of those miniature Christmas trees, you can use that too. You can also place a greeting card on the table that acts as the formal welcome for your guests.
There’s one more item you can add to your porch, but it deserves its own entry.
-
All About Wreaths
Christmas trees may be the most iconic piece of décor for this season, but wreaths aren’t too far behind. The moment you see one hanging on a door, you are immediately reminded that Christmas is fast approaching.
You likely already have a picture of the classic Christmas wreath in your mind right now. It is worth noting however that there is more than one type of Christmas wreath. If you’re feeling particularly creative, you can put one together yourself.
The Spruce notes that wreaths can be fashioned out of grapevines or decorated with fruits. Dressing up the more traditional wreath with some embellishments is also an option. You can also choose to hang more than one wreath if you have a larger door.
Whichever type of wreath you prefer, just make sure that it can hang straight. Also, try to keep the traditional Christmas colors present in it.
The holiday season is known as the most wonderful time of the year. By creating your own Christmas landscape, you can show that you have gotten fully into the spirit of the season. You don’t even need much to get your yard ready for Christmas. Just a few smart additions can turn any yard into a setting ready for the upcoming holiday.

5 Must-have Christmas Plants for your Garden
Christmas plants are a great addition to your garden décor. You can create an outdoor Christmas scene and trim sprigs and branches to bring indoors for fresh holiday decorations.
Gardeners love expanding their landscape design to incorporate interesting foliage during all the seasons. Having established plants and shrubs at the ready come Christmastime makes decorating a breeze.
These five must-have Christmas plants will make your garden landscape feel truly festive.
-
Nothing Says Christmas Plants Like Holly Shrubs
You can truly deck your halls with boughs of holly when you grow this hardy evergreen shrub. Once established, these bushes will provide a bounty of cuttings to create outdoor Christmas decoration in window boxes, wreaths, and more.
Holly shrubs grow best in partial shade and bloom with tiny white flowers. Only the female plant will burst forth with plentiful red berries that add bright color to your garden. However, they will need to be pollinated by bees that have visited a male plant.
Planting male and female holly shrubs near each other will provide proper pollination. Your holly shrub can then form the full display of foliage, flower, and fruit that makes this a Christmas favorite.
-
The Blue Spruce is the Perfect Christmas Tree
The center of any winter garden landscape design should be the Blue Spruce. This hardy pine tree is the perfect Christmas plant. String it in lights for your holiday outdoor deco plan or trim some boughs for fragrant garlands inside the home.
Caring for your Spruce takes little time and will provide your garden with an unusual color that will stand out boldly against other foliage. Plant several different heights of spruce at the same time for eye-catching interest.
Grow a new family tradition by planting your own "Christmas Tree" and let the Blue Spruce anchor your winter garden landscape design.
-
Deck the Garden with Vines of Ivy
Because it is an evergreen, Ivy has become a symbol of eternal life and is a favorite during the Christmas season for use in songs and decoration. Ivy is a great landscaping addition under trees where the shade makes it difficult for other plants to fill in.
The variegated leaves of the ivy plant create a lot of visual interest when it comes to Christmas plants. This plant makes a fantastic ground cover and does well trailing from pots and window boxes.
Long tendrils of Ivy can be trimmed and twisted together to make quick wreaths or garland at holiday time. The rest of the year, ivy makes a hardy groundcover, especially on steep hills or embankments where preventing soil erosion is a priority.
-
Mistletoe Plants are a Christmas Tradition
Most gardeners think it won't fit into their landscape design ideas. But mistletoe can be grown if you are up for the challenge.
Imagine how fun it would be to clip fresh mistletoe from your garden at Christmastime! Of course, you will need a host tree for your Christmas plant. These trees make excellent hosts for Mistletoe:
- Hawthorn
- Lime
- Apple
- Poplar
- Plums
- Maples
After you have established your host tree follow these steps to grow your mistletoe plant:
- Gently squeeze the seeds out of a fresh mistletoe berry. They come out surrounded by a clear substance like jelly. Remove as much of this jelly as you can without damaging the seed. Cleaning the seed makes germination easier.
- Choose branches on your host tree that are about six to eight inches in diameter. From the underside of the branch push the seeds into any crevices in the bark. Plant as many as you can since all of the seeds will not germinate. You can always thin the plants at a later time if they are too plentiful.
- Wait. Depending on weather and light conditions, it may take months for mistletoe seeds to germinate. Once they do sprout, they will not need any care whatsoever. As your mistletoe grows, you will want to fertilize your host tree regularly, so it can stay healthy.
Adding mistletoe will elevate your garden's Christmas plant display, and you will have plenty to hang in every doorway during the holiday season.
-
Yew Bushes Form Wonderful Winter Backdrops
Europeans have delighted in using yew branches in Christmas celebrations for centuries. Yews are not only a great Christmas plant but make a nice evergreen hedge. You can even shape it into an evergreen landscaping tree perfect for holiday decorations.
The yew has a rich, dark green color that lasts all year. In the fall, plentiful red berries cover the plant and add another layer of color to your garden. The plant can tolerate drought, bugs, and disease well making it a good base for your garden and overall landscape design plan that can add value to your home.
What is even better about the yew is that you can easily propagate new plants from cuttings. Take your new yew plants and fill in empty spaces in your garden or give to friends.
Boughs of yews make lovely holiday swags and garlands to decorate your home inside and out. String them along a fence and add lights for holiday cheer. Yew bushes can provide you with free Christmas decor year after year.
How to Prevent Soil Erosion During the Cold Months
Most people associate the term soil erosion with vast dust storms blowing up the topsoil and floods sweeping away the topsoil downstream during the summer and spring months. Only a few people realize that the cold winter months may also come with elements that contribute to soil erosion.
Like in the spring and summer months, soil erosion can be a big problem during the winter months. If you are a landscape owner, knowing the cause of soil erosion during the cold months can greatly assist you to plan on how to control erosion so as to minimize the effects of losing all your topsoil.
Top causes of soil erosion during the cold months
Wind
Winter winds can blow away unprotected topsoil. During the cold months, soil can become loose due to sudden and extreme changes in temperature. Once the strong winter winds come along, the loose topsoil goes along with them.
Water
Water is the leading agent of soil erosion. Unprotected topsoil will be loosened and then carried away during water runoff. The small rills in the soil will gradually transform into gullies which will accelerate soil erosion.
Controlling soil erosion during the cold months will not only assist in the preservation of the fertile topsoil around your home but also ensure that you have a landscape ready for spring planting.
Here are a few landscaping ideas that will help you to manage erosion during the cold months:
Know the Type of Soil you have in your garden
Knowing the kind of soil in your garden is the first step towards controlling soil erosion. Is it clay, loam, sand, or silt? To know your soil type, simply grab a handful and squeeze it. If it molds like plasticine, this means you have clay soil. If it falls to pieces, however, it is sandy soil. And if you find out that the soil is intermediate, you have loam soil in your garden. Knowing the kind of soil you have in your garden is crucial. It helps you determine the type of landscape design techniques you will need to utilize in preventing erosion.
Mulching
Mulching often acts as a soil insulator that helps to maintain soil moisture while promoting the growth of grass and plants. It is used as a temporary soil stabilizer. Moreover, with proper application, mulching can help to keep soil in place for a few days.
Depending on the slope grade of your land, you can replace the mulch regularly. Wood chips, straws, leaves, and sawdust make great mulching materials and are easily available for application. Simply spread these materials on the soil, especially around the plants to create a natural blanket of about 2 to 4 inches. This can be one of the most cost-effective ways of preventing erosion during the cold months.
Cover Plants
Plants play a significant role in anchoring the soil against the agents of erosion. Lack of proper cover plants means there is zero binding of the soil to the earth. Planting of quick growing cover plants can help control erosion. To get it right, speak with a residential landscaper about which cover plants can be viable. In Scotts Valley, most gardeners plant flower bulbs during the early winter months to help bind the soil against erosion.
Additionally, cover crops such as cereal rye and hairy vetch are perfect at binding the topsoil. They make it strong preventing it from being eroded by wind and water. Besides, these cover plants also increase the organic matter content and polish the soil structure. In addition, they enhance your topsoil's fertility.
Winter Weeds
Even though there is a possibility that the weeds will proceed to create various problems like taking over your garden once they are planted, they can be effective in preventing soil erosion. Winter weeds such as bittercress, dandelions, and chickweeds among others can offer a natural winter cover to prevent erosion.
Use of Erosion Control Blankets
These are layers of large mats that are ideal for application on steep slopes where the other erosion solutions can't be applied. The erosion control blankets not only prevent soil erosion but also offer soil stability. The blankets can also promote vegetative growth.
Since the blankets are anchored into the soil, they provide a more long-term erosion solution as compared to mulch. What's more, they seem to perform better in controlling soil erosion and need minimum maintenance in any application!
Hydromulch
A hydromulch is a spray that controls soil erosion during the cold months. You can apply hydromulch on your naked ground to help keep the topsoil stuck to the earth. You can mix it with the seeds of recommended cover plants and then apply so that the plants can grow to anchor the soil in place. This is ideal if you want a long-term solution to soil erosion. If you just want to control erosion over shorter periods, you don't have to mix the spray with the seeds. Although the spray is a better option as compared to mulch, it peels off quickly once it rains thus requires a re-application.
Conclusion
In most cases, gardeners and landscapers overlook the essence of controlling soil erosion during the cold months. However, controlling soil erosion can help safeguard soil resources while guaranteeing you a ready landscape for the upcoming planting season.

10 Masterful Holiday Landscaping Tips
You may have boxes and bins of interior holiday decorations organized, labeled and ready to deploy this holiday season. These decorations and your own careful planning can turn your home into a festive holiday wonderland.
But what about the exterior of your home? Tackling outdoor landscaping won't look like such a challenge (or a chore) with this list of 10 masterful holiday landscaping tips!
1. Divide and conquer holiday decorating in layers.
Wherever you choose to start your decorating (bottom, middle, top), the holiday decorations you select should be appropriate and balanced with what is above and below them.
For example, with sufficient pre-season planning, you can incorporate seasonal greenery to take care of your lowest level - around your home's foundation and along walkways and garden beds - naturally.
Festive leafy greens, radishes, pork and beans stonecrop, coastal gem, Tasmanian tiger and other winter-friendly colorful plants can add timely "pop" to your holiday landscape along with a few well-placed potted poinsettias.
2. Make your own fragrant wreaths.
Here in California, we are lucky to enjoy an abundance of native pine species.
Whether you have access to natural pine for the picking or you head down to your local greenhouse to select your supplies, this handy tutorial will walk you through the steps to weaving fresh greens, berries and other festive accents into your own fragrant holiday wreath!
3. Plant a living holiday tree.
The hands-down best way to plan ahead for future holiday landscaping needs is to plant your own living holiday tree. Happily, this is an idea that can also work for any size space, since, like homes today, potted holiday trees come in all shapes and sizes!
If you do decide to do this, however, be sure that you select a tree this year that still has the root ball attached and intact. If you want to install your holiday tree indoors this year and move it outside in the new year, choosing a smaller tree will minimize relocation stress on the root system.
4. Incorporate natural garlands interwoven with holly berries.
This can be a two-part project: this year, repurpose living pine garlands and weave in some holly berries for bright splashes of color throughout. These are great to hang around your doorways and from eaves.
With some strategic planting, you can add California holly bushes to your existing landscaping for a naturally festive presentation starting this time next year.
5. Create a living wall complete with holiday touches.
Living walls are transforming residential and commercial spaces around the nation in an ever-evolving effort to add more green to increasingly urbanized surroundings. Living walls also offer the added benefits of keeping the air you breathe cleaner and fresher and making use out of formerly dead space. Living walls also add extra natural insulation for more energy efficient heating and cooling. Best of all, a living wall can block out some of the ambient noise that makes nearby noise less intrusive.
Starting a living wall in time for the holidays doesn't have to be a big project! In fact, any wall with a bit of existing structure for climbing ivy or rosebushes to gain a foothold can work. Alternately, you can start by adding hanging boxes in sections, each featuring its own bit of festive greenery.
6. Make strategic use of potted plants.
Perhaps you are sifting through this list of holiday landscaping tips thinking that you already love your landscaping just the way it is and you don't want to add or change anything. If this describes you, this is the section you want to hone in on! With some strategic use of potted plants, you can transform your exterior home space naturally without interfering with your existing landscape design.
Winter lilies and poinsettia plants are two traditional holiday plants that are typically available in abundance during the holiday season. Many organizations also offer plants for sale on a donation or fixed-fee basis to help support their non-profit work, which is a great way to support a charity you love while livening up your home space at the same time!
7. Considering renting your holiday greenery and decorations.
By renting greenery such as living Christmas trees and poinsettias, you can boost your home's holiday curb appeal without contributing to the excess of discarded greenery littering curbs after the holidays conclude.
It can feel so good knowing that the living holiday greenery you are renting will be put to good use in other areas in need of trees and plants after the holidays are over! You may even want to advertise what you are doing with placards on your lawn to encourage neighbors to pitch in and donate their gently used holiday plants and trees to a good cause.
8. Choose one central theme as your holiday landscaping focal point.
Whether it is a beautifully decorated living holiday tree, a series of fresh pine garlands and wreaths, a fun traditional lawn display that you use every year or something else, choosing one central theme and building the remainder of your landscape around it will greatly simplify the time and expense of holiday decorating!
9. Keep it simple with lighting.
You can't go wrong when approaching lawn lighting as if you are an art gallery manager placing lights for strategic impact. Simple white lights in perfect positions - for example, one single electric candle in each window - give your home timeless, classic lighting appeal without stressing either your budget or your holiday preparation workload.
10. Be safe when installing holiday landscaping!
It is easy to skimp on safety when time is of the essence. But a word from our family to yours - please don't! Be sure your circuits are rated to handle the lighting load. Take extra care if you decide to use real candles indoors or outdoors. And if your decorations plans require climbing ladders, consider calling a pro to lend a hand!

7 Sporty Landscaping Ideas for Your Backyard
Californians are blessed with great weather almost every time of year. Is your boring backyard keeping you from enjoying it? From basketball and bocce ball courts to trampolines, gyms, and more, there are a ton of sporty backyard landscaping ideas to turn your lackluster backyard into a fun, active space to enjoy anytime you want. Here’s a look at seven sporty backyard landscaping ideas just about everyone can implement for year-round calorie burning and fun.
1. Basketball or Sports Court
Home sports or basketball courts are popular backyard additions for several reasons. They can be used for basketball, dodgeball, and just about anything requiring a little smooth concrete. If you have a large backyard, you can go big with a full-court basketball court, which measures 60 feet x 90 feet. However, for smaller spaces, a 30-foot x 50-foot half-court can be just as fun.
The court itself can be made of poured concrete. Traditionally, this is the most popular choice. However, today, co-polymer tiles and rubberized Plexipave materials can also be used. As far as the hoop goes, you can permanently install a nice hoop with a glass backboard and anchor it into the ground, or you can opt for a portable hoop you can simply roll out of the way when using the court for something else.
When installing a basketball court, you should also consider the time of day you expect to play most often. This will allow you to situate it to avoid shooting into the sun. You should also trim any low-lying tree branches nearby that may interfere with your shot. Since sloping backyards are quite common in California, you can also construct a retaining wall and tuck the court into the side of the slope to create a little extra space.
2. Trampoline
Everyone loves trampolines. They’re a ton of fun! Plus, they’re a great form of exercise as well. Best of all, they’re pretty easy to install and don’t take up a lot of space. In fact, the largest trampolines only measure about 14 feet in diameter, making them viable for backyards of all sizes.
Unfortunately, due to lack of sunlight, lawns don’t fare well underneath trampolines. So, if you opt for an above-ground trampoline, it’s best to plan and prepare your trampoline area ahead of time by laying gravel or decomposed granite.
An in-ground trampoline may be a great option as well. Not only will it be safer since it isn’t as high up off of the ground, but it will be easier to use and likely get used more often as well. Plus, with an in-ground trampoline, there’s no need to install unsightly safety nets. In fact, you can even do a little excavation and surround it with natural grasses to make it almost completely out of sight.
Just keep drainage in mind. Otherwise, you may end up with a water-filled pit every time it rains. Fortunately, in comparison to other parts of the country, the California coast is blessed with minimal rainfall, so this may not be much of an issue.
3. Bocce Ball
Despite its Italian roots, bocce ball is becoming increasingly popular in the states. The long, narrow court should be made of materials like sand, decomposed granite, or crushed oyster shell for minimal bounce. These materials also don’t require any water, which is a plus in the California climate.
The standard bocce ball court measures 90 feet x 13 feet, so it’s perfect for both long and narrow or short and wide backyards. Depending on how serious you take the game, you can also shorten the court to 60 feet. As with in-ground trampolines, proper drainage is critical to avoid puddling on the court. Crushed gravel and French drains with perforated pipes and canvas sleeves work great.
In terms of court construction, you can use concrete blocks or rail ties 12-18 inches in height to form the perimeter walls. That’s pretty much all there is to it. Whether you choose the backyard or a side yard, you can have it ready and ready to get your bocce ball on in no time at all.
4. Putting Green
A backyard putting green won’t help you burn many calories, but it will help you improve your golf game and always give you something to do. Like pool tables, they’re great for entertaining and socializing as well. When installing a putting green, make sure to place it near the house to get the most out of it both personally and socially. However, since errant chips shots may occur, make sure to place it a safe distance from windows.
As far as materials are concerned, artificial turf is best, because it has a consistently even surface and doesn’t require constant watering and maintenance. Artificial turf also drains well and cleans up easy after a “pet mess.” Considering that an artificial turf putting green only costs a few dollars more per square foot than one made with regular turf, it’s a smart option all the way around.
When creating your backyard putting green, don’t be afraid to make a challenging. A flat oval putting green with a single hole can get boring really fast, so keep things interesting by including some undulations, a sand pit, and a few holes. Additionally, include some landscape lighting for some after work fun and stress relief.
5. Volleyball Court
Volleyball is a fun activity for family, friends, neighbors, and anyone else you want to join in. A standard volleyball court measures 50 feet x 80 feet, but you can make it smaller to accommodate almost any size yard. In addition to the poles and net, make sure to include back lines and sidelines. For this, you can use rope, garden edging, or weather-resistant wood.
When creating a sand volleyball court, which is most popular for backyards, you’ll need to excavate the court area down to two to three feet and install a drainage ditch tor French-style drains to minimize puddling. Then, lay a one-foot layer of smooth gravel and a layer of landscape fabric or burlap overtop. Finally, place a foot or so of beach sand on top and rake it to create a smooth, level playing surface.
Since a tight net is a must for volleyball, make sure you have sturdy poles in place to support it. Whether you choose galvanized metal poles or poles made out of treated lumber, they should be anchored into the ground with concrete footings to keep them straight and in place. After all, no one likes a sagging net!
6. Horseshoes
Horseshoes is a fun game everyone can’t help but love. It’s also one of the easiest sporty backyard lawn ideas to implement. It can be played on sand, gravel, decomposed granite, or even the lawn. With so many different terrains in central California backyards, this makes it a perfect option.
When making a horseshoe “pit,” you’ll need to place two stakes approximately 40 feet apart. Then, you just drive the stakes into the ground and draw a couple of lines to pitch behind. That’s really all there is to it. However, you can also include rebounds boards made of pressure treated lumber or rail ties behind each stake as well. This will help keep sand in its place and the horseshoes from scattering all over the yard.
7. Gym
In central California, you’re blessed with great weather most of the year, which means you can take your workouts outside. If you have a covered patio big enough to fit your equipment, you’re in luck. Not only do you have adequate floor space already in place for your equipment, but you’ll be covered from the weather. You're able to work out in the fresh air virtually any time you want.
If not, you can put up a gazebo or another shade structure. If you’re really serious, you can also pour a concrete patio slab or install pavers to create a level, sure-footed space for both you and your workout equipment. This will also give you a place to place slip-resistant mats and do aerobics, yoga, pilates, or tai chi.
If privacy is a concern, you can incorporate reed fencing or put in a privacy screen. You may want to also consider lighting, especially if you like to work out early in the morning or in the evenings after work.
K&D Landscaping, Inc. – Your commercial and residential landscape design, installation and maintenance company serving Santa Cruz, Scotts Valley & Watsonville, CA.

5 Amazing Landscaping Ideas for Pet Owners
Your pets are your best friends and loyal companions to the end. However, balancing their needs with those of your landscape can be a challenge at least. Whether you're worried about maximizing playtime fun with your pet, keeping your pet safe, or creating a garden that fido won't destroy in his daily digging, there are many factors you have to account for during landscaping before you can sit back and drink in the warmth and beauty of your garden. Landscaping for pets is possible with a little bit of planning.
With a bit of planning, you can build a landscape that will keep both your pets and yourselves happy with the greenery and refreshing experience of your outdoors. There are plenty of features you can work with that are pet-friendly. Coexisting with your furred friends has never been easier.
Provide a Safe Water Feature
In the dry heat of the Californian summer, your cats and dogs will be looking for ways to cool off. You can give them a wet welcome while providing your landscape with a relaxing centerpiece by installing a water feature. Artificial water sources can be an asset and provide a relaxing atmosphere to your yard with a natural fixture and the tinkling of falling water.
If you decide on a water feature, pick out one that's beneficial to your furry friends as much as your yard. Avoid a body of water like a pond that your pet will have trouble entering and exiting. Certain designs of streams can also be inconvenient and potentially dangerous for your overheated pet. A fountain will provide spectacular beauty and the relaxing sound of rushing water, coupled with eager barking as your dog runs back and forth through the water streams.
Help Prevent Urine Spots With Hardscaping
Dogs go poorly with grass lawns. You can avoid the ugly brown splotches by swapping from grass to hardscape. The benefits of making this switch go beyond easing maintenance work. Hardscape requires no tedious, expensive, and labor-intensive lawn care and maintains its looks regardless of watering, which is especially valuable during California's drought season. Dog owners would get especial value out of patio stone and masonry because they minimize the damage dogs can do with their digging and urinating. Put stone paths down where your dog walks. They've claimed their spots, and you can't change that.
Mulch also provides great value. It provides the same maintenance benefits as stone tiles. In addition, it can act as an attractive space filler around your flower beds and shrubs. If you intend to grow plants in the mulch, select drought-resistant plants like Agave since mulch heats up in the summer. Don't lay the mulch directly against the plants, and build a patio.
Know Your Lawn Type
If you're dead-set on having a lawn, a green carpet, then make sure you are planting the right species of grass, or you'll rack up the maintenance bills. Some types of grass hold up better to paw traffic and people traffic and other forms of abuse like others. Warm-season grasses are perfect for central California as they can withstand the heat of summer. The toughest of the warm-season grasses is Bermuda grass. These grasses are tougher, but dogs will still leave urine spots behind.
There is an alternative leafy green carpet that won't leave urine stains: Clover. It does not stain like grass lawns do, and has many advantages in durability and water use over a grass lawn.
Find Friendly Plants
Some pets, especially cats, will chow down on the vegetation from time to time. While cats are usually quite selective about what they eat, just be sure to keep any toxic plants out of your garden. Once you've crossed all the toxins off your list you can set about planting as many friendly greens as you can to create a pet-friendly garden.
Populate your garden with good plants to make your pet at home. Safe plants include bamboo, rose, violet, lavender, and summery sunflowers. Lavender has the added benefit of reducing fleas for your dog. On top of those, there are some garden herbs which are as fine for your cat as for you, including dill, sage, rosemary, and tarragon. These will even improve your cat's health when eaten.
Poison Ivy is a basic no-no as animals suffer the same itchy fate as humans. You should scour your garden and eradicate any encroaching trace of the pest. Cats especially will avoid most harmful plants, but it's better to be safe than sorry as the consequences of them consuming something hostile are dire. Lilies and foxglove are beautiful but toxic to your cat's kidneys. Other bad plants include Wisteria, Oak, Peony, buttercup, crocus, and daffodil.
Invest in Barriers
One way to keep dogs out the garden parts of your yard or inside your lawn is to build a fence. A basic physical barrier to keep your pet inside. They also had a cute border to your garden. The white picket fence is a classic and picket fences in general work. Wooden lattice fences are just as attractive. You can also fence off a specific play area with hardscaping for your pet, and leave the rest of your land untouched by man's best friend.
There are lesser boundaries. Edging your flower gardens with rocks can protect your lavender from destruction by your pets. Don't even think of using metal edging that will scratch up your poor pooch. You can, however, install a metal cage around your trees to protect them from scratching by cats and urinating by dogs. The most important part is that you have established barriers between your pet and your garden.
K&D Landscaping, Inc. – Your commercial and residential landscape design, installation and maintenance company serving Santa Cruz, Scotts Valley & Watsonville, CA.

How to Stop Weeds From Growing
A landscape full of bothersome weeds is a daunting chore to tackle. It is much easier to control weeds before they reach a mature age. Fortunately, there are many ways to stop weeds from growing. Try a few, or all, of these effective weed prevention methods to have a beautiful lawn and garden.
Cultivate Healthy Plants
One of the best methods of keeping unwanted plants out of your garden is to make the area as inviting as possible to the plants you want to be there. Nourishing your flowers, grass, and vegetables means they will have the best chance of claiming resources that all plants want. Making your plants strong will give them the best access to water, soil nutrients and sunlight. Any weed seeds that try to sprout will not be able to thrive in an area where sunlight is blocked by healthy foliage and strong root systems muscle out the competition and use all moisture in the soil. The weeds won’t have a chance against these formidable competitors.
Don't Introduce Weed Seeds Into Your Landscape
Weed seeds find their way into your landscape through many different methods. Wind, birds and the bottom of your shoes are all common methods of transportation. While you can’t prevent most of these methods, there are certain things you can do to prevent more seeds than necessary finding their way into your soil. Compost is a big culprit for hiding seeds.
Whether you make your own compost or bring it in from an outside source, you should check it for seeds before you introduce it into your landscape. Fill three or four small containers with the compost, and water it for around a week. If plants begin to sprout, the compost never got hot enough to kill seeds. You can sterilize it by heating it to the proper temperature before using it.
Make Physical Weed Barriers
If seeds aren’t allowed to germinate in your soil, they can’t become weeds. In order to keep weeds from sprouting in your garden, use a physical barrier. A thick layer of mulch is a good way to keep most weeds from growing. You can use a variety of materials as mulch. Some gardeners use a standard mulch such as wood chips. Some get extremely creative and use unusual items like coffee beans or smooth glass as mulch. Any material that keeps moisture in the soil and deprives little weeds of light will work as mulch.
Use a Pre-Emergent
Sometimes the best way to keep a seed from turning into a weed is to treat it with substances that prevent the weed from growing. These substances are called pre-emergents, and they work by using the biology of a plant against it. Pre-emergents remove the plant’s ability to form new root cells. Without these cells, the weed is unable to take in sufficient water and nutrients. It is a fairly easy way to eliminate weeds without the bother of pulling them up, but it is not appropriate to use in all situations.
Since pre-emergent targets all seeds, not just weed seeds, if you plan to overseed your lawn or plant new flowers from seed, this method will not work. If you decide a pre-emergent is the way to go, you can choose from a few different options. Chemical pre-emergents come in a liquid form and a granular form. Both of these are easy to evenly spread over the area where you want to prevent weeds. If you prefer an organic, chemical-free route, you can use corn gluten meal. This corn byproduct has been found to be an extremely effective pre-emergent.
Crop Adult Plants
Weeds are very good at reproducing. That is why some people find them so difficult to control. If you have fully grown weeds in your landscape, neglecting them can make your life miserable for the next few growing seasons. These adult plants flower, the next step in their life cycle is producing many little seeds that fall into your soil to germinate during the next season. Interrupting this cycle can save you a few headaches down the road.
You do not have to uproot the weeds to effectively interrupt their growing cycle. Simply crop the tops off the plants before they go to seed. This will prevent thousands of seeds from making their way into your soil.
Avoid Tilling
It is just a fact of nature that soil is full of millions of seeds. They have likely been sitting several feet deep in the soil waiting for their day in the sun. One of the best things you can do to give them the water and sunlight they need to be healthy weeds is till your soil. Tilling is an old practice that has uses in some instances, but it is rarely necessary for a home gardener.
If you want to till the ground for a new bed, there are methods you can use that eliminate weeds prior to planting your seeds. You should schedule a few weeks for this process. Till up the area where you want your garden and give it a thorough soaking. Wait a week and you will notice many tiny green sprouts poking out of the earth. Use a hoe to get rid of all these tiny weeds, and you are ready to plant your garden.
Water Wisely
Using your water wisely will make your garden much healthier and deprive weeds of a chance to thrive. In Santa Cruz, intelligent watering is always a good idea for conservation reasons as well. Only water in the morning when your plants have their cells open to receive the morning dew. As the day progresses, plant cells close and watering is all but useless. If you water at night, the moisture has no time to evaporate from the leaves of your plants. Plants that are damp all night are more susceptible to disease and pests. Weakening your plants in this way gives weeds far more of a chance at thriving than they should have.
Remember, weeds are just plants you don’t want in your garden. Understanding how plants eat, grow and thrive can help you come up with creative ways to stop weeds from growing. With the right tools and knowledge, you can relax in a weed-free landscape.
K&D Landscaping, Inc. – Your commercial and residential landscape design, installation and maintenance company serving Santa Cruz, Scotts Valley & Watsonville, CA.
5 Best Landscaping Tips for Busy Homeowners
While there are people who like to toil in their gardens for hours at a time, drinking in the smells and textures of a garden, you don't have to spend hours each week to tend to your landscaping if you don't want to. It takes some planning to create something special that is low maintenance, but it is completely doable for anyone willing to do a bit of research.
If you set it up right, you can leave to go on vacation for a month and never worry about hiring someone to water your garden or cut your grass. There are plenty of materials you can work with that don't require much time or water. Going green has never been so easy or economical.
1. Hardscaping
Landscaping can be as creative as you are and doesn't need to be limited to plants and grass. Use rocks, pavers, brick and gravel to spice up any yard or garden. Pavers are perfect for creating walkways around the garden. Identifying paver colors that are high-contrast that can be mixed and matched for interesting geometric patterns are sure to add some pizzazz to your landscaping efforts.
Retaining walls, fireplaces and patios are also a nice way to work hardscaping into the plan. Entertainment areas are especially unique and magical expressions of hospitality as you sip a glass of wine with your friends. Placing some plants around in strategic spots will break up the hard surfaces and add some texture and life to what can become cold if not done properly.
2. Plant hearty, evergreen shrubs and plants that are water and weather tolerant.
While some plants require constant care and attention, there are alternatives that can be planted once, rarely needing much from you after the initial planting. Evergreen shrubs are a particularly interesting choice. Drought-resistant shrubs and plants are the perfect addition to any low-maintenance garden area.
Check out bottlebrush buckeye, Texas rancher, hosta, forsythia, yew and black-eyed susans to find what will work best for the area you are in. Yew is a particular favorite because it is drought resistant and acclimates to almost any type of soil well. The purple Texas ranger is another favorite, flowering with purple blooms as a hearty and drought resistant choice. It does require full sun though.
3. Add a deck or living space outdoors.
Decks and other seating areas incorporate some wood and comfort into outside decor as a nice complement to living things. Teak wood is a favorite deck material that is long-lasting and gorgeous when stained with the right color. Fluffy outdoor pillows add to the comfort and aesthetic appeal of an outdoors space. Awnings and umbrellas are also nice touches in warmer regions where shade is necessary.
Interesting planters, bird baths and decorative water cans add a lot of personality to your garden. Chimes are another item that some people love with a variety of shapes and sounds available.
4. Use low-maintenance water features to increase the wow factor.
Water features can cause many unwanted problems if you aren't careful about what you select. Who can resist the soothing sound of water gurgling in the yard? Fountains are recommended over ponds since they are easier to clean. If the water flows briskly, then it will prevent an algae problem. Fountains also attract birds, if you enjoy having these colorful creatures around singing to anyone within listening range.
5. Plant hearty, decorative grasses that do not need much water.
The grass typically planted in yards is high-maintenance and requires cutting. Unless you want to pay a yard service or be in your yard weekly working on your lawn, you don't want to plant this type of grass. The good news is that there are many varieties of tall grasses that rarely need any attention once it is planted.
Check out switchgrass, muhly, bluestem and fountain grass as tall grasses that provide ground cover and some aesthetic appeal. These grasses can be used to provide privacy screens from nosy neighbors and are also good for soaking up water in the yard after heavy rains. There is no mowing requirement, but you may have to trim them back occasionally.
Conclusion
Some of the prettiest landscapes you will ever see practically care for themselves. While there are many designers who will be happy to design a low-maintenance garden for you for a fee, there are plenty of books and online sources that can provide the information you need to design the garden and yard of your needs. Above are some tips to get you started.
One of the reasons landscaping is more challenging than interior design is because plants are living, breathing entities that expand in size. Where many people go wrong is they don't account for the size the plants or bushes will become as they grow. Variables like the amount of sun or shade needed, water requirements and how well they complement the other landscaping elements in the immediate vicinity all come together to either create a paradise or a greedy, high maintenance project that is ongoing.
K&D Landscaping, Inc. - Your commercial and residential landscape design, installation and maintenance company serving Santa Cruz, Scotts Valley & Watsonville, CA.